

Distributed Rate Limiting, Explained: From a Boba Shop Queue to Production Java, 4 Classic Algorithms and a Complete Architecture Overview
A complete guide covering 4 classic algorithms, runnable Jedis/Redisson/Gateway implementations, and high-concurrency pitfalls.


Rate limiting is something every backend engineer eventually runs into. Product launches, new releases, scrapers, buggy callers. Any of them can push a system to its limits. This article skips theory for its own sake. Four algorithms are explained through a single boba shop, and the second half drops straight into Java code you can compile and run, plus the architecture diagrams.
Before writing it, I set myself four goals.
All four algorithms explained through the same boba shop, so nothing gets introduced twice.
Three implementations you can compile and run, one each for Jedis, Redisson, and the gateway.
Ten Mermaid diagrams and five boba shop illustrations, so both the algorithms and the scenes have visuals.
Production pitfalls and selection advice you can actually decide with.
Conventions. The code targets Spring Boot 2.7.x, Redisson 3.23.x, Jedis 4.3.x, and Spring Cloud Gateway 2021.0.x. Everything compiles on Java 8 and newer, and the important lines have comments.
Chapter 1: Why you need rate limiting, starting with an API overload
A popular open source project ships a new release, and everyone upgrades within hours. CI retries, issue lookups, and status polling all hit the GitHub API at once, and traffic multiplies in a short window. Endpoints start timing out, third-party integrations fail, and the alert channel fills up. Any team that runs a public API recognizes this pattern. Stripe has an engineering blog post about rate limiters. GitHub’s API docs publish the hourly quota. AWS API Gateway has token bucket throttling built in. Google’s SRE workbook devotes a chapter to client-side throttling so servers do not get overwhelmed.
I have read this postmortem too many times. Afterward, everyone says the same thing. If only we had rate limiting.
Rate limiting is not a config flag you flip and forget. The algorithm, the code, and the architecture all matter, and production will remind you if any layer is wrong.
Rate limiting is the last line of defense for a system. It does not make the system faster. It keeps overloaded requests out when pressure exceeds capacity, so the main services survive. Everything below follows from that.
1.1 How that traffic wave takes a system down
A typical API overload plays out like this.
Traffic exceeds the API’s capacity, and the business thread pool starts queueing.
Slow requests fill the database connection pool, and new requests cannot get a connection.
Clients retry after timeouts, and the retries pile onto the same endpoints.
Dependent services time out one after another, and the outage spreads from the primary API to everything around it.
Scaling out does not help in time. New instances get flooded too.
These incidents share a pattern. The system collapses after traffic exceeds capacity, and a code bug is usually just the trigger. Response times go from 20ms to 2s. Slow requests fill the thread pool, health checks start failing, the registry evicts instances, and traffic moves to the survivors, making things worse in a loop.
Each stage amplifies the one before it. Rate limiting stops the extra traffic at stage one.
1.2 The line between local and distributed rate limiting
Local rate limiting keeps its state inside a single JVM. Guava’s RateLimiter, a Semaphore, or an AtomicLong counter all count. With one instance it is simple, fast, and has no network cost. That breaks the moment you run several instances. Three instances each allowing 100 requests means 300 total, so the limit is meaningless.
Distributed rate limiting puts the state somewhere every instance shares, usually Redis. Each instance runs the same Lua script against the same key, so no matter how many machines are in the cluster, one threshold controls the total.
The rule of thumb is simple. Where does the state live? In JVM memory, it is local rate limiting. In shared storage like Redis, it is distributed. Neither is better, they just fit different situations.
Two conditions force you to go distributed.
The service runs multiple instances, and the limit has to apply globally.
The quota is counted per user, account, or device, which a single machine cannot tally.
Public API quotas, anti-abuse, and global risk control fall into the second group. Single-machine protection, local fallbacks, and local debugging can stay with local rate limiting.
1.3 What rate limiting actually protects
Everyone talks about smoothing out peaks. On a real system, rate limiting protects three things.
Downstream capacity. Databases, third-party APIs, and message queues all have throughput ceilings. Leaky buckets and token buckets keep the input rate inside what they can handle.
Service SLA. Under heavy traffic the main endpoints still respond within the limit, so timeout and error rates stay controlled.
Failure boundaries. Overloaded requests stay outside the system instead of cascading into other services.
Those three map to two places. The traffic entry point caps the total, and resource-facing layers such as databases absorb slow, sustained pressure.
The first protects resources, the second protects the experience, and the third protects everything around it.
Chapter 2: Four classic rate limiting algorithms, explained through everyday scenes
2.1 Meet the boba shop
Four algorithms explained separately tend to drift apart, so I put them all in one shop. The shop is called Boba Planet, on the ground floor of an office building, with a pink sign and white lettering that lights up around noon. The queue runs from the counter to the street corner. The owner hears nothing but order calls all day, and by the time the pearls are cooked there is no time to scoop them. He sets a rule, and when it stops working, he replaces it. The four algorithms are the four rules he went through, each one fixing a weakness of the last while introducing a new problem.

The order of the rules is the order the algorithms evolved. First you solve whether there is a limit at all, then how accurate it is, then how smooth, then whether it can handle bursts.
2.2 Fixed window counter
2.2.1 The shop’s version
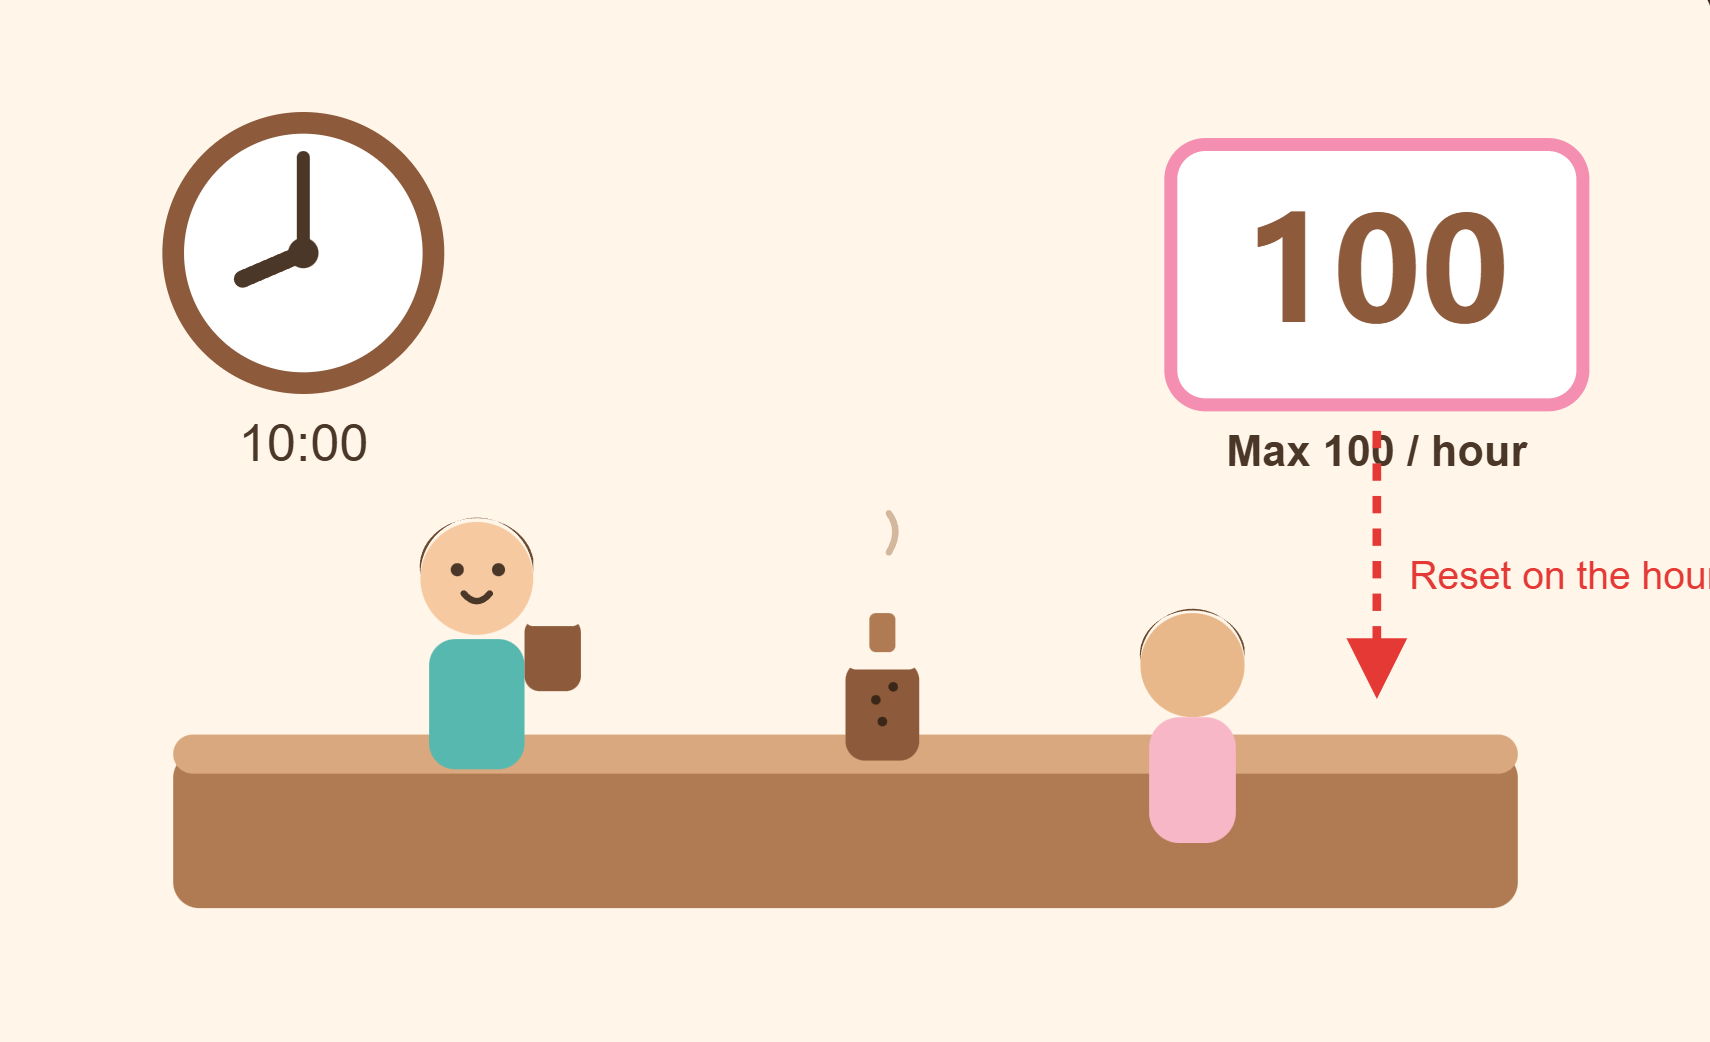
The first rule is the simplest. One hundred orders per hour. The barista clicks a counter with every order, and at 100 the shop puts up the full sign. The counter resets on the hour. A customer at 9:58 may be turned away, while someone at 10:00 on the dot can order immediately.
2.2.2 The mechanics
A fixed window implementation ties the count to an expiration. One Redis key per window. Each request runs INCR, the first write sets a 60 second expiry, and once the count passes the threshold, requests are rejected. When the window ends, the key disappears and a new window starts. The whole thing is O(1) and uses one counter’s worth of memory.
Only two Redis commands are involved, INCR and EXPIRE. When the first INCR returns 1, set EXPIRE 60. The count keeps growing inside the window, and the key disappears when the window ends. In Lua the two steps can be merged so the expiry setup does not race with the first request.
2.2.3 The boundary spike
The problem is at the window boundary. The 100th order lands at 9:59:59, the counter resets at 10:00:00, and another 100 orders pass at 10:00:01. Two hundred orders in two seconds, twice the limit. The algorithm only knows windows, not time, so a burst that straddles the boundary makes the limit pointless.

A fixed window only counts the current window and clears at the boundary. The 9:00 window and the 10:00 window each allow 100 orders, so the two seconds around the boundary have no window of their own. That is the boundary spike. A sliding window treats adjacent windows as one continuous span and closes the gap.
2.2.4 Trade-offs and when to use it
The upsides are simplicity, memory usage, and speed. The downside is that boundary traffic can double. It is good enough for SMS codes, login attempt limits, and basic abuse protection where a small overshoot is acceptable. For a public API that cares about the total, do not rely on it alone.
If the requirement is simply 100 orders per window with immediate rejection after that, a fixed window still works, as long as you accept the brief overshoot at the boundary.
2.3 Sliding window counter
2.3.1 The shop’s version
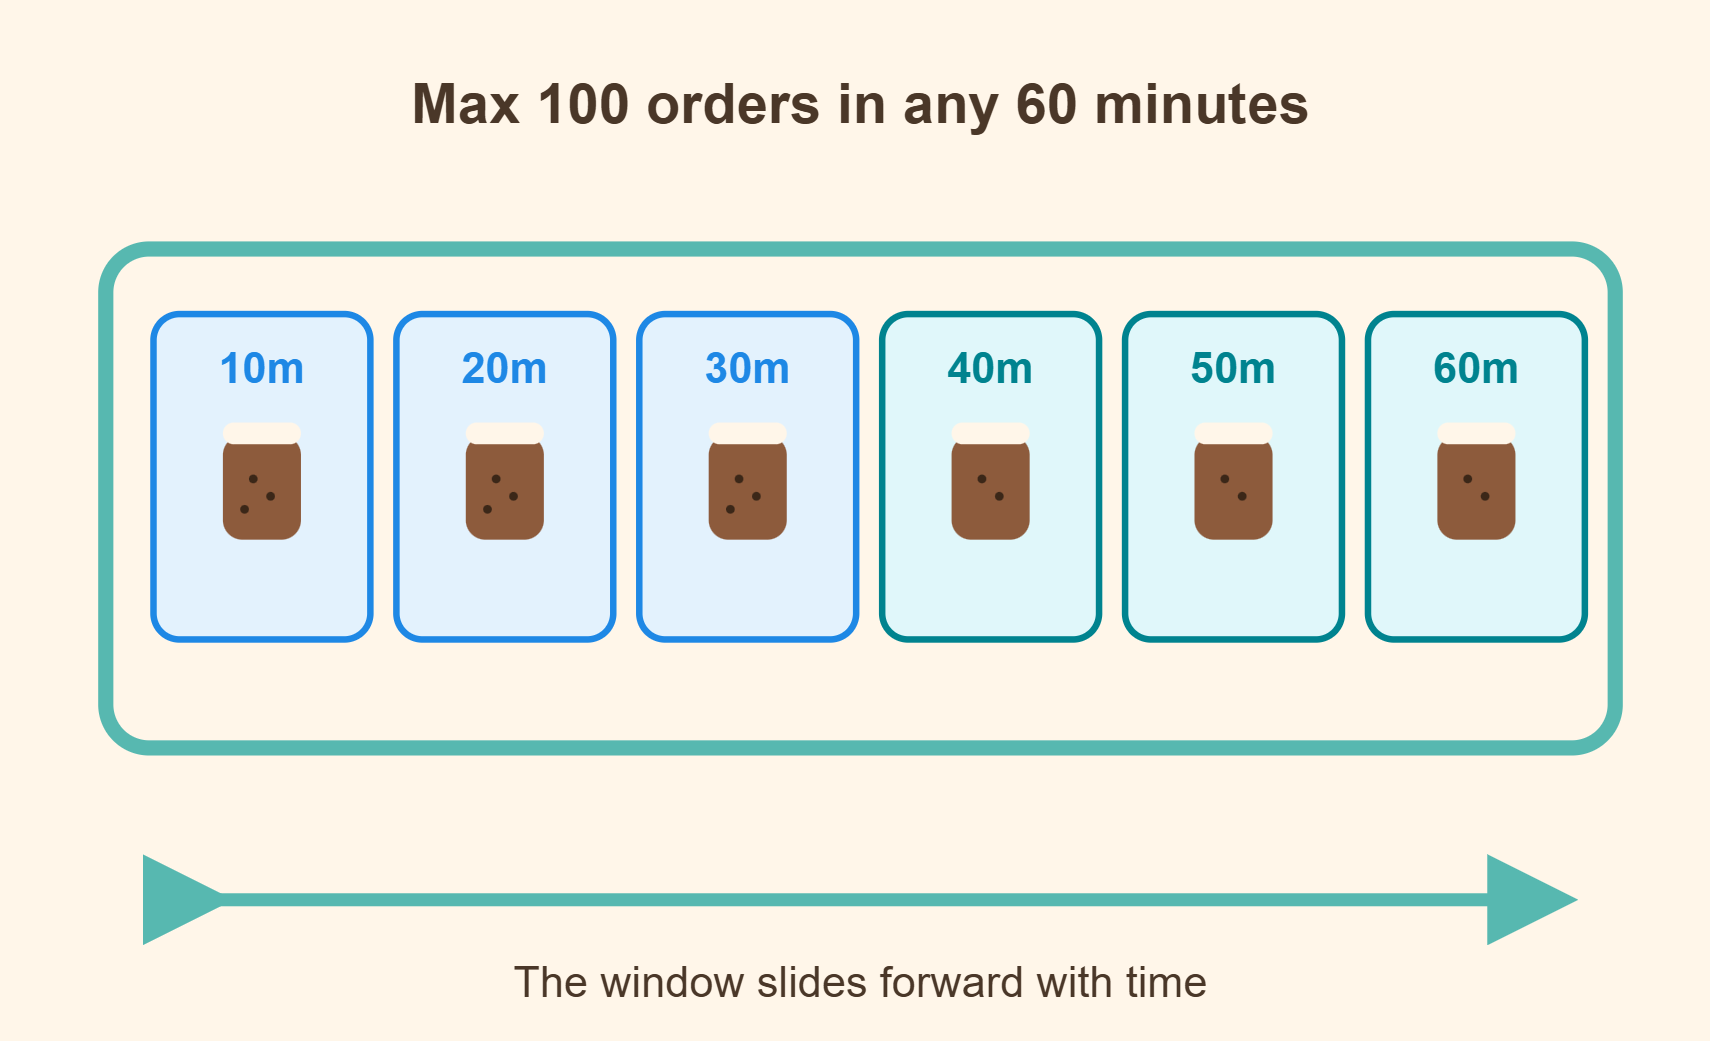
After seeing the boundary problem, the owner changes the rule. At most 100 orders in any continuous 60 minutes, not per clock hour. The barista splits the hour into six 10-minute slots, marks a tally in the matching slot for every order, and at any moment counts the last six slots. The window slides forward with the current time, so 9:59 and 10:01 fall inside the same window.
2.3.2 The mechanics
There are two common implementations. The first uses a sorted set. Each request’s timestamp becomes a member, ZREMRANGEBYSCORE removes everything outside the window, and ZCARD counts what is left. The second splits time into a fixed number of small counter keys, increments the slot each request lands in, and sums the last N slots when checking. Finer slots get closer to true sliding, at a higher memory and CPU cost.
The sorted set approach adds a member for every request, so the set grows with traffic. Production usually picks the second option and trades a little accuracy for a bounded cost.
2.3.3 Trade-offs and when to use it
It is accurate and gets rid of the boundary spike for good. The price is that every request leaves a trace, so memory and CPU costs are clearly higher. It suits login protection, endpoint scraping defense, and risk control rules where accuracy matters. At very large scale, teams usually layer local counters on top instead of sending every request to Redis.
A common starting point is 6 to 12 slots for a 60 second window. Going down to one second slots gets expensive fast.
2.4 Leaky bucket
2.4.1 The shop’s version
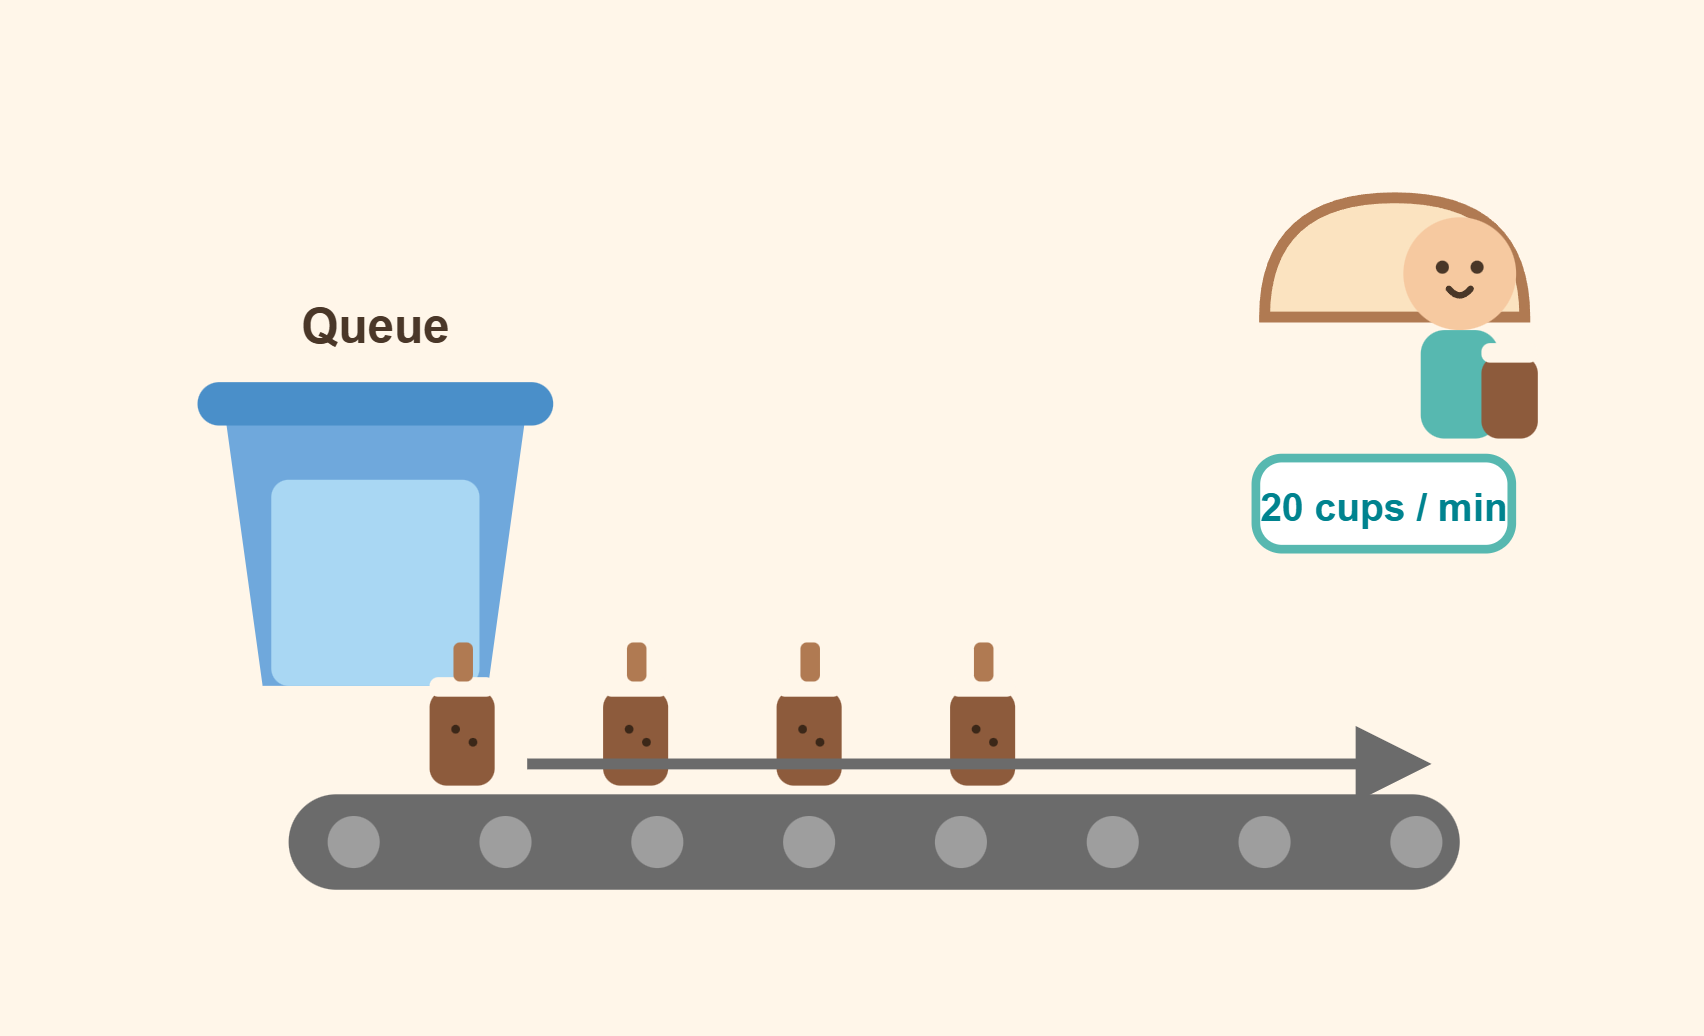
The third rule takes a different angle. The owner stops limiting how many orders are taken. A conveyor belt at the pickup counter delivers drinks at a steady pace, 20 cups per minute. Whether 20 or 200 people are waiting, the kitchen does not speed up. When the waiting area is full, new customers are turned away and told to come back.
2.4.2 The mechanics
A leaky bucket drops requests into a bucket with a fixed drain rate. An arriving request enters if there is room and is rejected if the bucket is full. Requests flow out at a constant rate and get consumed by the backend. The implementation only tracks two values, the current water level and the last drain time, and each request computes how much water leaked based on the elapsed time.
The drain is all about elapsed time. Ten seconds between two requests means ten seconds’ worth of water leaks out, and the longer the gap, the emptier the bucket. This is the mirror image of a token bucket refilling tokens.
2.4.3 Trade-offs and when to use it
The output is perfectly smooth. The downstream always sees a constant rate, with no bursts at all. The trade-off is that bursts have no chance. Even if the system built up spare capacity while idle, it cannot release it at peak. It fits databases, third-party APIs, and message consumers that demand a stable rate.
2.5 Token bucket
2.5.1 The shop’s version
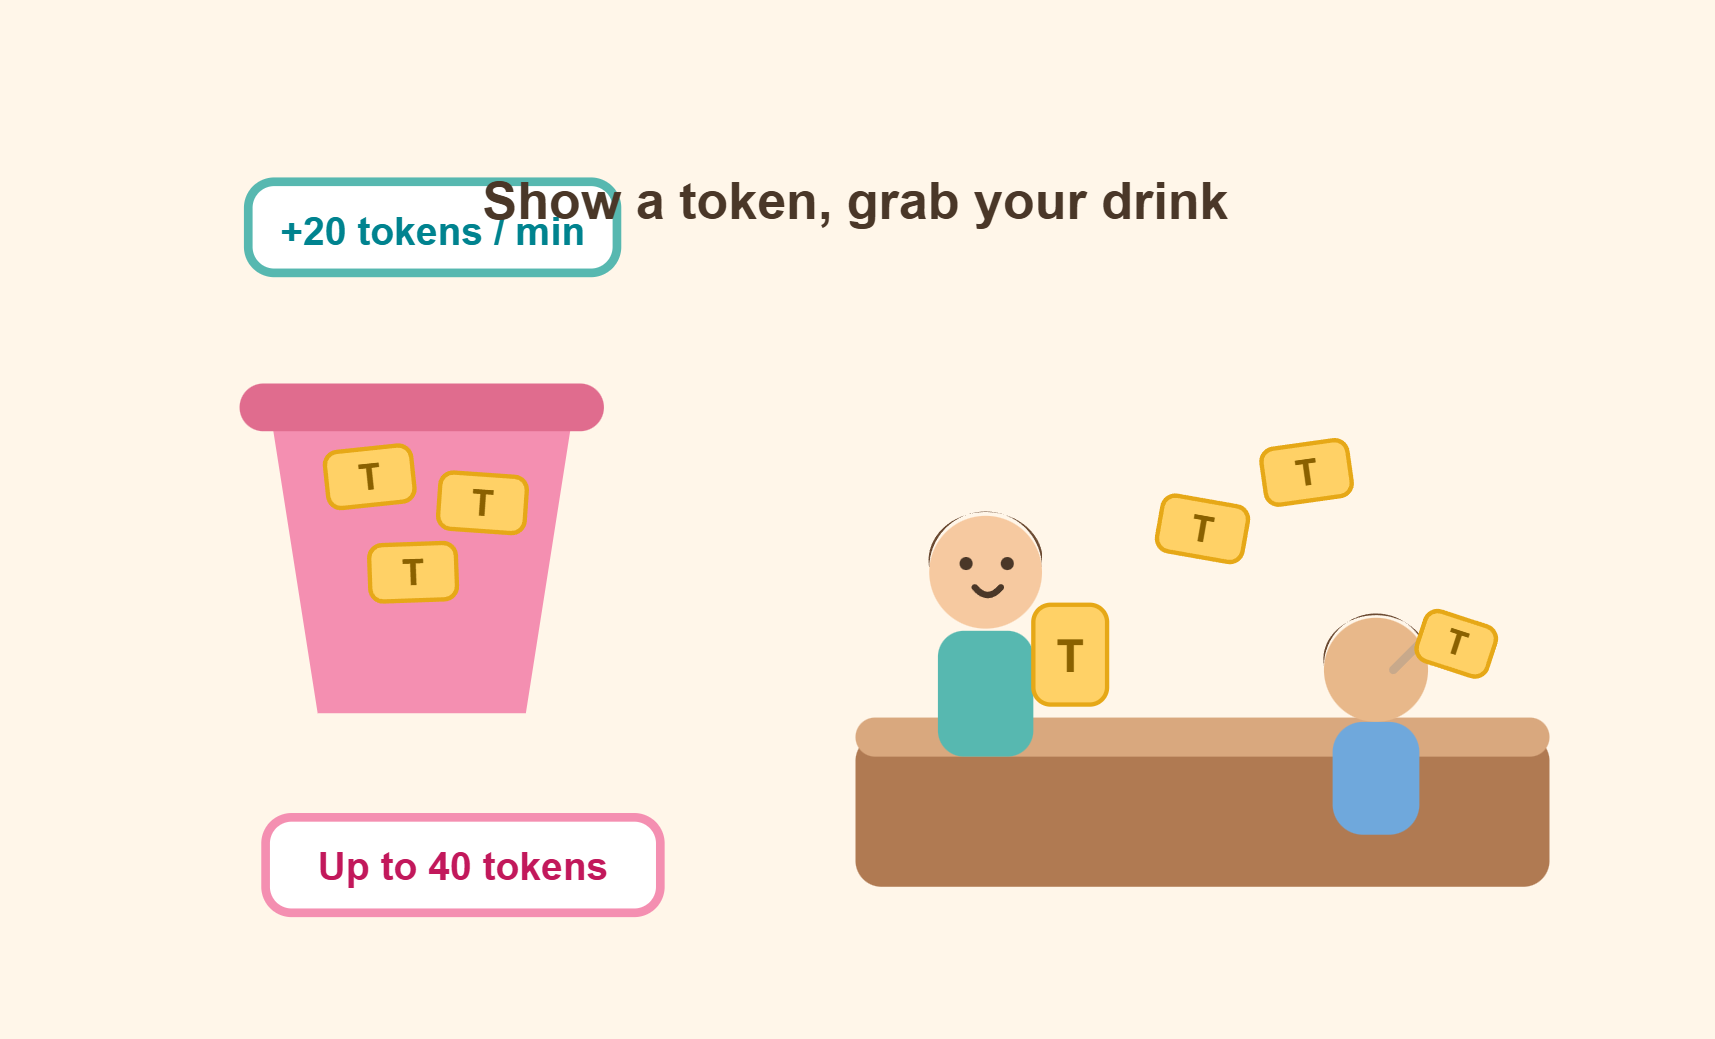
The fourth rule finally handles bursts. The kitchen produces 20 bright yellow pickup tokens per minute and drops them into a bucket that holds at most 40. A customer grabs a token to pick up a drink, immediately if one is available, and waits for a fresh token otherwise. When traffic is light, tokens pile up. When the lunch rush hits, the first wave can spend the 40 accumulated tokens at once, while the kitchen refills at 20 per minute.
2.5.2 The mechanics
A token bucket has two parameters, the refill rate and the bucket capacity. Tokens are produced at a fixed rate, and the capacity caps how many can accumulate. A request consumes a token, passes if one is available, and is rejected or waits if not. Compared with a leaky bucket, the extra ability to save tokens is where bursts come from. The implementation keeps two values, the token count and the last refill time, which is a bit more work than a counter.
A common starting point for tuning is simple. Set rate to what the downstream can sustain, and set capacity to the largest burst the business allows. Capacity must be above 1, or the token bucket degrades into a leaky bucket.

Tokens refill at a fixed rate and the capacity sets the ceiling. When a request arrives, the bucket is checked first. Enough tokens means a deduction and a pass. Otherwise the request is rejected or waits. Saved tokens from idle periods are what make bursts possible, and that is the biggest difference from a leaky bucket.
2.5.3 Trade-offs and when to use it
It balances smoothness and bursts. The rate is capped, and short spikes can reach the capacity ceiling. The risk lives in the capacity parameter. Set it too high and a spike still overwhelms the downstream. Public APIs, gateway entrances, and most business rate limiting use it, which makes it the most common choice in production.
In practice, the most common token bucket implementation is Redis Lua, and all three implementations in Chapter 3 use it.
2.6 Side-by-side comparison and how to choose

My default is the token bucket. It controls both rate and bursts and covers most business scenarios. Pick the leaky bucket when smoothness is a hard requirement, the sliding window when accuracy is, and the fixed window when the only goal is cheap scraping protection.
Start with what you are protecting. Databases and abuse protection are different problems, and no single algorithm wins everywhere.
2.7 A question to think about
Question Why do public APIs like Stripe and the GitHub API almost always use a token bucket instead of a leaky bucket?
Callers of public APIs routinely burst. CI reruns, data syncs, and batch jobs can fire dozens of requests in the same second. A leaky bucket flattens that wave entirely, clients wait a long time, and timeout retries make it worse. A token bucket lets callers spend accumulated tokens at once, so part of the first peak gets through while the average rate stays capped by rate. Stripe’s engineering post on rate limiter design uses the token bucket as the main algorithm. Rate limiting keeps traffic inside what the system can handle. Short peaks are allowed, sustained overload is not. The same logic applies to thresholds. Size capacity for the peak and rate for the average, and the wider the gap between them, the more jitter the system absorbs.
Chapter 3: Distributed rate limiting in Java, production code you can compile and run
3.1 Why atomicity comes first
Rate limiting logic has three steps. Read the state, decide, deduct. When Java writes them as separate operations, races are unavoidable. Two requests both read one remaining token, both decide they can pass, and both go through. The limit fails on the spot.
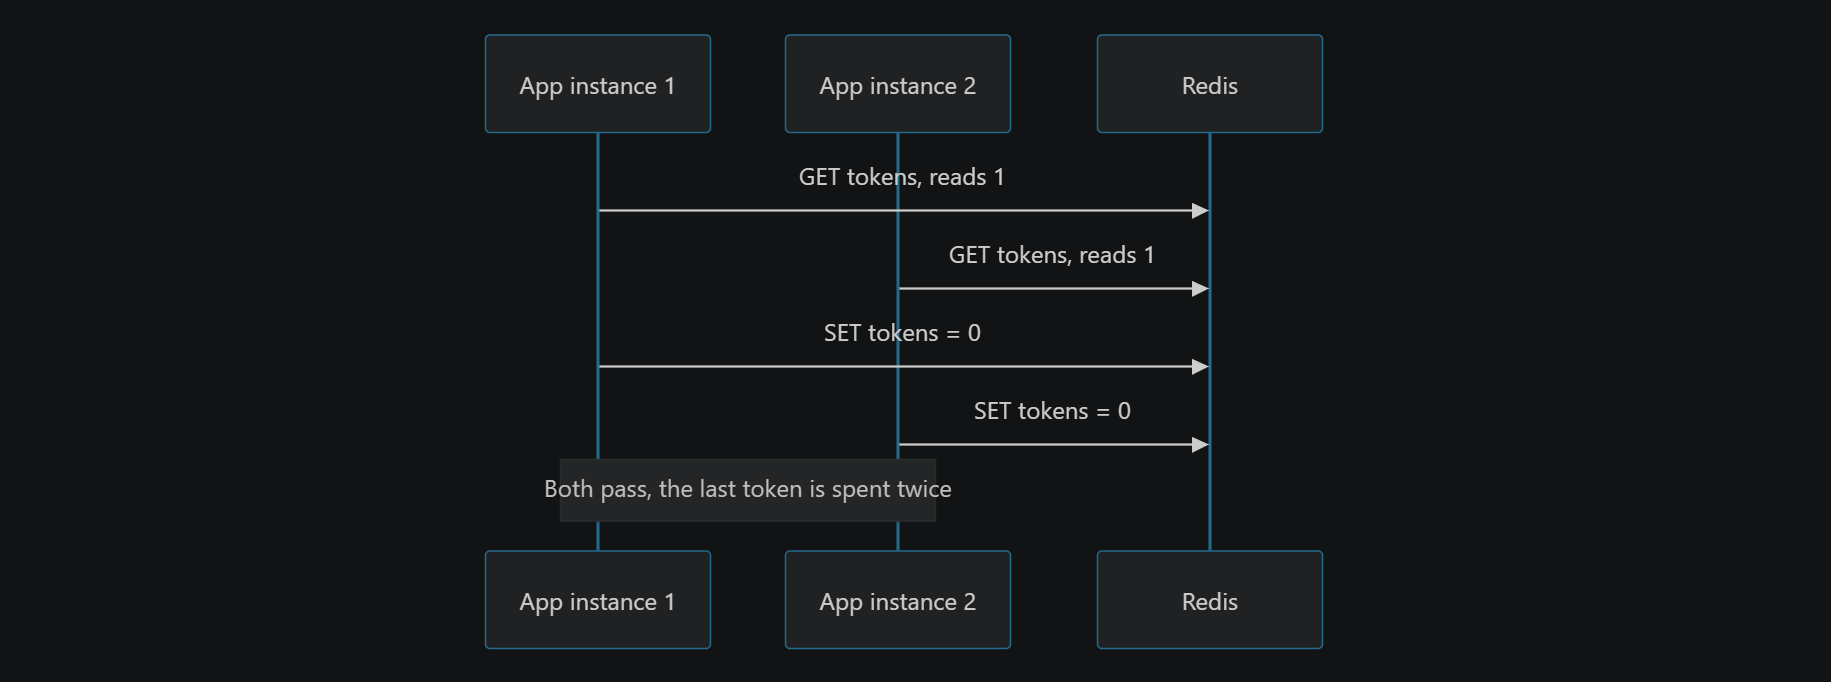
Java splits the read, the decision, and the write into three Redis calls, so two instances can interleave and both see the stale value. Lua merges the three steps into one atomic execution, and a request that arrives later only ever sees the deducted result. That is what keeps distributed rate limiting correct.
A lock works on a single machine, but a JVM lock cannot stop another machine. A distributed lock is slow, heavy, and adds a new failure point. Redis solves this with Lua. Redis executes commands on a single thread, and when EVAL runs a script, the whole script completes atomically with no other command interleaved. Put the read, the refill, the decision, and the deduction in one script, and the race is gone.
There are two side benefits. One round trip runs the whole check, which beats a chain of GETs and SETs. And the logic lives on the Redis side, so the Java layer does not have to implement concurrency control.
For contrast, WATCH and MULTI can achieve atomicity with optimistic locking, but conflicting requests have to retry, and the retry rate explodes at peak. Lua has no retry cost. The script runs and the result is final. That is why mainstream rate limiting components all use Lua.
3.2 Implementation 1: plain Java, Redis, and a Lua token bucket
This option only depends on Jedis and does not tie you to a framework. It fits a self-built middleware or a project sensitive about dependencies.
3.2.1 Maven dependencies
Jedis 4.3.1, JUnit 5.9.2 for tests, and the Maven compiler targets Java 8.
<project xmlns="http://maven.apache.org/POM/4.0.0"
         xmlns:xsi="http://www.w3.org/2001/XMLSchema-instance"
         xsi:schemaLocation="http://maven.apache.org/POM/4.0.0 http://maven.apache.org/xsd/maven-4.0.0.xsd">
    <modelVersion>4.0.0</modelVersion>

    <groupId>com.example</groupId>
    <artifactId>ratelimit-jedis</artifactId>
    <version>1.0.0</version>
    <packaging>jar</packaging>

    <properties>
        <maven.compiler.source>8</maven.compiler.source>
        <maven.compiler.target>8</maven.compiler.target>
        <project.build.sourceEncoding>UTF-8</project.build.sourceEncoding>
        <jedis.version>4.3.1</jedis.version>
        <junit.version>5.9.2</junit.version>
    </properties>

    <dependencies>
        <dependency>
            <groupId>redis.clients</groupId>
            <artifactId>jedis</artifactId>
            <version>${jedis.version}</version>
        </dependency>
        <dependency>
            <groupId>org.slf4j</groupId>
            <artifactId>slf4j-api</artifactId>
            <version>1.7.36</version>
        </dependency>
        <dependency>
            <groupId>org.slf4j</groupId>
            <artifactId>slf4j-simple</artifactId>
            <version>1.7.36</version>
            <scope>test</scope>
        </dependency>
        <dependency>
            <groupId>org.junit.jupiter</groupId>
            <artifactId>junit-jupiter</artifactId>
            <version>${junit.version}</version>
            <scope>test</scope>
        </dependency>
    </dependencies>

    <build>
        <plugins>
            <plugin>
                <groupId>org.apache.maven.plugins</groupId>
                <artifactId>maven-surefire-plugin</artifactId>
                <version>3.0.0</version>
            </plugin>
        </plugins>
    </build>
</project>
3.2.2 The Lua script
Put the script below at src/main/resources/lua/token_bucket.lua. Refilling, deciding, and deducting all happen inside one EVAL, which is where the atomicity comes from.
-- Token bucket rate limiting script
-- KEYS[1]  bucket key, a hash that stores the token count in 'tokens' and the last refill time in 'ts'
-- ARGV[1]  bucket capacity, the maximum number of tokens that can accumulate
-- ARGV[2]  refill rate in tokens per second
-- ARGV[3]  tokens consumed by this request
-- Returns 1 to allow, 0 to reject

local key = KEYS[1]
local capacity = tonumber(ARGV[1])
local rate = tonumber(ARGV[2])
local requested = tonumber(ARGV[3])

-- Use the Redis server time to avoid clock drift on client machines
local t = redis.call('time')
local now = tonumber(t[1])

local tokens = tonumber(redis.call('hget', key, 'tokens') or capacity)
local last = tonumber(redis.call('hget', key, 'ts') or now)

local elapsed = now - last
if elapsed > 0 then
    tokens = tokens + elapsed * rate
    if tokens > capacity then
        tokens = capacity
    end
end

-- Write back the refilled token count whether the request passes or not
redis.call('hset', key, 'tokens', tokens, 'ts', now)

if tokens >= requested then
    redis.call('hset', key, 'tokens', tokens - requested, 'ts', now)
    return 1
end

return 0
The script deliberately reads the time from the Redis server instead of accepting a client-supplied timestamp. Skewed clocks across application servers cannot affect the decision. The script uses the TIME command, and since Redis 5.0 scripts replicate by effects, the rate-limiting state stays consistent after a failover.
The argument order is fixed. The caller passes capacity, rate, and requested, and the script only computes. That keeps one script reusable across endpoints, with the key separating business dimensions.
3.2.3 The Java utility class
package com.example.ratelimit;

import java.io.BufferedReader;
import java.io.IOException;
import java.io.InputStream;
import java.io.InputStreamReader;
import java.nio.charset.StandardCharsets;
import java.util.Arrays;
import java.util.Collections;
import java.util.List;

import org.slf4j.Logger;
import org.slf4j.LoggerFactory;

import redis.clients.jedis.JedisPooled;
import redis.clients.jedis.exceptions.JedisException;
import redis.clients.jedis.exceptions.JedisNoScriptException;

/**
 * Distributed token bucket rate limiter built on Jedis.
 * All state lives in Redis, so multiple instances share one bucket.
 *
 * @author Dylan
 */
public class TokenBucketRateLimiter implements AutoCloseable {

    private static final Logger log = LoggerFactory.getLogger(TokenBucketRateLimiter.class);

    private static final String LUA_PATH = "/lua/token_bucket.lua";

    private static final String LUA_SCRIPT = loadScript(LUA_PATH);

    private final JedisPooled jedis;

    /** Whether to allow requests when Redis fails. true keeps the business available, false rejects to protect the downstream. */
    private final boolean failOpen;

    /** SHA of the Lua script, loaded with SCRIPT LOAD on first use. */
    private volatile String scriptSha;

    public TokenBucketRateLimiter(JedisPooled jedis) {
        this(jedis, true);
    }

    public TokenBucketRateLimiter(JedisPooled jedis, boolean failOpen) {
        this.jedis = jedis;
        this.failOpen = failOpen;
    }

    /**
     * Try to acquire permits tokens.
     *
     * @param key      the rate limit dimension, for example order:create:9527
     * @param capacity bucket capacity
     * @param rate     tokens refilled per second
     * @param permits  tokens needed by this request
     * @return true to allow, false to reject
     */
    public boolean tryAcquire(String key, double capacity, double rate, int permits) {
        try {
            List<String> keys = Collections.singletonList(key);
            List<String> args = Arrays.asList(
                    String.valueOf(capacity),
                    String.valueOf(rate),
                    String.valueOf(permits));
            Object result = eval(keys, args);
            return Long.parseLong(result.toString()) == 1L;
        } catch (JedisException ex) {
            log.error("Rate limiting failed, applying the fallback policy, key={}", key, ex);
            if (failOpen) {
                return true;
            }
            throw new RateLimitUnavailableException("Rate limiter unavailable", ex);
        }
    }

    private Object eval(List<String> keys, List<String> args) {
        if (scriptSha == null) {
            scriptSha = jedis.scriptLoad(LUA_SCRIPT);
        }
        try {
            return jedis.evalsha(scriptSha, keys, args);
        } catch (JedisNoScriptException ex) {
            // The script cache is lost when Redis restarts, so reload and run once more
            scriptSha = jedis.scriptLoad(LUA_SCRIPT);
            return jedis.evalsha(scriptSha, keys, args);
        }
    }

    private static String loadScript(String path) {
        try (InputStream in = TokenBucketRateLimiter.class.getResourceAsStream(path)) {
            if (in == null) {
                throw new IllegalStateException("Lua script not found: " + path);
            }
            StringBuilder sb = new StringBuilder();
            try (BufferedReader reader = new BufferedReader(
                    new InputStreamReader(in, StandardCharsets.UTF_8))) {
                String line;
                while ((line = reader.readLine()) != null) {
                    sb.append(line).append('\n');
                }
            }
            return sb.toString();
        } catch (IOException ex) {
            throw new IllegalStateException("Failed to read the Lua script", ex);
        }
    }

    @Override
    public void close() {
        jedis.close();
    }
}
Two details worth knowing. The script is loaded once with SCRIPT LOAD and then executed with EVALSHA, which saves sending the script on every call. Redis can drop its script cache on restart, so JedisNoScriptException is caught and the script is reloaded once.
The companion exception class follows.
package com.example.ratelimit;

/** Thrown when the rate limiter is unavailable, used in fail-closed scenarios. */
public class RateLimitUnavailableException extends RuntimeException {

    public RateLimitUnavailableException(String message, Throwable cause) {
        super(message, cause);
    }
}
3.2.4 Unit tests
The tests need a local Redis at 127.0.0.1, port 6379. The first test fires 100 concurrent requests against a bucket with capacity 10 and expects exactly 10 to pass. The second verifies that tokens refill over time.
package com.example.ratelimit;

import java.util.UUID;
import java.util.concurrent.CountDownLatch;
import java.util.concurrent.ExecutorService;
import java.util.concurrent.Executors;
import java.util.concurrent.TimeUnit;
import java.util.concurrent.atomic.AtomicInteger;

import org.junit.jupiter.api.AfterAll;
import org.junit.jupiter.api.BeforeAll;
import org.junit.jupiter.api.Test;

import redis.clients.jedis.JedisPooled;

import static org.junit.jupiter.api.Assertions.assertEquals;
import static org.junit.jupiter.api.Assertions.assertFalse;
import static org.junit.jupiter.api.Assertions.assertTrue;

class TokenBucketRateLimiterTest {

    private static final String HOST = "127.0.0.1";
    private static final int PORT = 6379;
    private static final String KEY_PREFIX = "test:token-bucket:";

    private static JedisPooled jedis;
    private static TokenBucketRateLimiter limiter;

    @BeforeAll
    static void setUp() {
        jedis = new JedisPooled(HOST, PORT);
        limiter = new TokenBucketRateLimiter(jedis, true);
    }

    @AfterAll
    static void tearDown() {
        jedis.close();
    }

    @Test
    void concurrentRequestsShouldBeLimitedByCapacity() throws Exception {
        String key = KEY_PREFIX + UUID.randomUUID();
        int total = 100;
        int capacity = 10;
        // Keep the refill rate tiny during the test so only the initial tokens are available
        double rate = 0.001;

        ExecutorService pool = Executors.newFixedThreadPool(total);
        CountDownLatch ready = new CountDownLatch(total);
        CountDownLatch start = new CountDownLatch(1);
        AtomicInteger passed = new AtomicInteger();
        AtomicInteger rejected = new AtomicInteger();

        for (int i = 0; i < total; i++) {
            pool.submit(() -> {
                ready.countDown();
                try {
                    start.await();
                } catch (InterruptedException e) {
                    Thread.currentThread().interrupt();
                    return;
                }
                if (limiter.tryAcquire(key, capacity, rate, 1)) {
                    passed.incrementAndGet();
                } else {
                    rejected.incrementAndGet();
                }
            });
        }

        assertTrue(ready.await(10, TimeUnit.SECONDS), "threads did not become ready");
        start.countDown();
        pool.shutdown();
        assertTrue(pool.awaitTermination(30, TimeUnit.SECONDS), "tasks did not finish in time");

        assertEquals(10, passed.get(), "only 10 of 100 concurrent requests should get tokens");
        assertEquals(90, rejected.get(), "the other 90 requests should be rejected");
        jedis.del(key);
    }

    @Test
    void tokensShouldRefillOverTime() throws Exception {
        String key = KEY_PREFIX + UUID.randomUUID();
        int capacity = 2;
        double rate = 1.0;

        assertTrue(limiter.tryAcquire(key, capacity, rate, 2), "the first request should pass");
        assertFalse(limiter.tryAcquire(key, capacity, rate, 1), "should reject once the tokens run out");
        Thread.sleep(1100);
        assertTrue(limiter.tryAcquire(key, capacity, rate, 1), "should refill tokens after 1.1 seconds");
        jedis.del(key);
    }
}
3.2.5 How to run it and verify it works
How to run it.
Start Redis.
docker run -d -p 6379:6379 --name redis7 redis:7-alpinePut the pom.xml, the Lua script, and the two Java classes into a Maven project, keeping the directory layout.
Run
mvn test.
How to verify it. Watch the test output. The concurrency test passes 10 and rejects 90, and the refill test passes again after waiting 1.1 seconds. Both assertions passing means the rate limiting works.
3.3 Implementation 2: Redisson
Redisson wraps the token bucket in RRateLimiter, which is the fastest option to wire into a production project.
3.3.1 Dependencies and configuration
Spring Boot 2.7.x pairs with Redisson 3.23.x. Matching the versions matters, because a mismatch shows up as class loading errors at startup.
<dependency>
    <groupId>org.redisson</groupId>
    <artifactId>redisson-spring-boot-starter</artifactId>
    <version>3.23.5</version>
</dependency>
<dependency>
    <groupId>org.springframework.boot</groupId>
    <artifactId>spring-boot-starter-aop</artifactId>
</dependency>
spring:
  application:
    name: ratelimit-redisson
  redis:
    host: 127.0.0.1
    port: 6379
    database: 0
The starter exposes a RedissonClient bean, and both the utility class and the aspect get their limiter from it.
Redisson’s limiter is also Lua under the hood, with the script and connection management wrapped up. rate and rateInterval combine into a speed, for example rate=20, rateInterval=1, unit=SECONDS means 20 tokens per second.
3.3.2 Calling it through a utility class
package com.example.ratelimit.redisson;

import java.util.concurrent.TimeUnit;

import javax.annotation.Resource;

import org.redisson.api.RRateLimiter;
import org.redisson.api.RateIntervalUnit;
import org.redisson.api.RateType;
import org.redisson.api.RedissonClient;
import org.springframework.stereotype.Component;

/**
 * Wraps the initialization and acquisition of RRateLimiter.
 *
 * @author Dylan
 */
@Component
public class RedissonRateLimiterUtil {

    @Resource
    private RedissonClient redissonClient;

    /** Non-blocking acquisition, returns false immediately when no token is available. */
    public boolean tryAcquire(String key, long rate, long rateInterval,
                              RateIntervalUnit unit, int permits) {
        RRateLimiter rateLimiter = redissonClient.getRateLimiter(key);
        // The config is only written on the first call, already configured keys are skipped
        rateLimiter.trySetRate(RateType.OVERALL, rate, rateInterval, unit);
        return rateLimiter.tryAcquire(permits);
    }

    /** Acquisition with a wait time, blocking the current thread while waiting. */
    public boolean tryAcquire(String key, long rate, long rateInterval,
                              RateIntervalUnit unit, int permits,
                              long timeout, TimeUnit timeUnit) {
        RRateLimiter rateLimiter = redissonClient.getRateLimiter(key);
        rateLimiter.trySetRate(RateType.OVERALL, rate, rateInterval, unit);
        return rateLimiter.tryAcquire(permits, timeout, timeUnit);
    }
}
Two things to keep in mind. trySetRate only applies when the key does not exist yet, so changing a threshold means deleting the old key and setting it again. RRateLimiter keys do not expire on their own, so watch Redis memory over the long run.
3.3.3 Calling it through an annotation
First define the annotation. The key supports SpEL placeholders such as order:create:#userId, and the annotation itself carries no logic, only the dimension and the rate.
package com.example.ratelimit.redisson;

import java.lang.annotation.ElementType;
import java.lang.annotation.Retention;
import java.lang.annotation.RetentionPolicy;
import java.lang.annotation.Target;

import org.redisson.api.RateIntervalUnit;

/** Method-level distributed rate limiting annotation. */
@Target(ElementType.METHOD)
@Retention(RetentionPolicy.RUNTIME)
public @interface RateLimit {

    /** Rate limit key, supports #parameterName placeholders */
    String key();

    /** Rate value */
    long rate() default 10;

    /** Rate window length */
    long rateInterval() default 1;

    /** Rate window unit */
    RateIntervalUnit unit() default RateIntervalUnit.SECONDS;

    /** Tokens consumed per call */
    int permits() default 1;
}
Next comes the aspect. It resolves the key, initializes the limiter, and performs the decision. The aspect binds the annotation with @Around, grabs a token before the method runs, and throws when it cannot.
package com.example.ratelimit.redisson;

import javax.annotation.Resource;

import org.aspectj.lang.ProceedingJoinPoint;
import org.aspectj.lang.annotation.Around;
import org.aspectj.lang.annotation.Aspect;
import org.aspectj.lang.reflect.MethodSignature;
import org.redisson.api.RRateLimiter;
import org.redisson.api.RateType;
import org.redisson.api.RedissonClient;
import org.springframework.expression.ExpressionParser;
import org.springframework.expression.common.TemplateParserContext;
import org.springframework.expression.spel.standard.SpelExpressionParser;
import org.springframework.expression.spel.support.StandardEvaluationContext;
import org.springframework.stereotype.Component;

/**
 * Resolves the rate limit key from the annotation and method arguments,
 * then runs the token acquisition uniformly.
 *
 * @author Dylan
 */
@Aspect
@Component
public class RateLimitAspect {

    private static final ExpressionParser PARSER = new SpelExpressionParser();
    private static final TemplateParserContext TEMPLATE = new TemplateParserContext();

    @Resource
    private RedissonClient redissonClient;

    @Around("@annotation(rateLimit)")
    public Object around(ProceedingJoinPoint joinPoint, RateLimit rateLimit) throws Throwable {
        String key = resolveKey(rateLimit.key(), joinPoint);
        RRateLimiter rateLimiter = redissonClient.getRateLimiter(key);
        rateLimiter.trySetRate(RateType.OVERALL, rateLimit.rate(), rateLimit.rateInterval(), rateLimit.unit());
        if (rateLimiter.tryAcquire(rateLimit.permits())) {
            return joinPoint.proceed();
        }
        throw new RateLimitException("Too many requests, please try again later");
    }

    private String resolveKey(String template, ProceedingJoinPoint joinPoint) {
        if (template.contains("#")) {
            MethodSignature signature = (MethodSignature) joinPoint.getSignature();
            StandardEvaluationContext context = new StandardEvaluationContext();
            String[] paramNames = signature.getParameterNames();
            Object[] args = joinPoint.getArgs();
            if (paramNames != null) {
                for (int i = 0; i < paramNames.length; i++) {
                    context.setVariable(paramNames[i], args[i]);
                }
            }
            return PARSER.parseExpression(template, TEMPLATE).getValue(context, String.class);
        }
        return template;
    }
}
The companion exception follows. It extends RuntimeException, so the business layer can catch it and return a unified error code.
package com.example.ratelimit.redisson;

public class RateLimitException extends RuntimeException {

    public RateLimitException(String message) {
        super(message);
    }
}
Here is the annotation in a business method. The key uses the #userId placeholder, and the aspect pulls the real user ID from the method arguments.
package com.example.ratelimit.service;

import org.redisson.api.RateIntervalUnit;
import org.springframework.stereotype.Service;

import com.example.ratelimit.redisson.RateLimit;

@Service
public class OrderService {

    @RateLimit(key = "order:create:#userId", rate = 20, rateInterval = 1,
            unit = RateIntervalUnit.SECONDS, permits = 1)
    public Order createOrder(Long userId, OrderCreateRequest request) {
        // normal business logic
        return new Order();
    }
}
If getParameterNames() returns null, add the -parameters flag to the compiler plugin so the aspect can resolve #userId.
3.3.4 Notes for cluster environments
Cluster mode keeps its configuration in a separate file that application.yml points to.
spring:
  redis:
    redisson:
      file: classpath:redisson-cluster.yaml
clusterServersConfig:
  nodeAddresses:
    - "redis://10.0.0.11:6379"
    - "redis://10.0.0.12:6379"
    - "redis://10.0.0.13:6379"
  scanInterval: 1000
  timeout: 3000
  retryAttempts: 2
  retryInterval: 1500
A few things deserve attention in cluster mode. Use RateType.OVERALL so the whole cluster shares one bucket, because PER_CLIENT only makes sense on a single machine. Prefix keys with the business dimension, for example rate:order:create:9527, so endpoints do not pollute each other. Keep the Redis timeout short. The rate limiter must not slow down the main flow, and timeouts should fall through to the fallback policy.
Sentinel and Cluster have different configuration layouts, and a migration should also check that the script keys land in the same slot. Single-key scripts are unaffected. Multi-key scripts must use hash tags to keep their keys together.
3.3.5 How to run it and verify it works
How to run it.
Start Redis, add the dependencies, and configure application.yml.
Inject RedissonRateLimiterUtil, or annotate a method with @RateLimit.
Start the application and call the endpoint repeatedly.
How to verify it. Set rate to 1 with a 1 second window. Fire requests within one second. The first passes and the rest return RateLimitException or false. Wait one second, request again, and it passes again.
3.4 Implementation 3: Spring Cloud Gateway
3.4.1 Why put rate limiting at the gateway
The gateway is the single entry point for traffic. Rate limiting there means zero changes to business code. Rejected requests never reach the services, which saves resources across the entire call path. The rules stay in one place and can combine route, IP, and user dimensions freely.
The cost is worth knowing too. Every request pays one Redis round trip, so the limiter itself becomes a cap on the gateway’s QPS. Account for it during capacity planning.
3.4.2 Dependencies and basic configuration
Spring Boot 2.7.18 with Spring Cloud 2021.0.8.
<parent>
    <groupId>org.springframework.boot</groupId>
    <artifactId>spring-boot-starter-parent</artifactId>
    <version>2.7.18</version>
</parent>

<properties>
    <spring-cloud.version>2021.0.8</spring-cloud.version>
</properties>

<dependencies>
    <dependency>
        <groupId>org.springframework.cloud</groupId>
        <artifactId>spring-cloud-starter-gateway</artifactId>
    </dependency>
    <dependency>
        <groupId>org.springframework.boot</groupId>
        <artifactId>spring-boot-starter-data-redis-reactive</artifactId>
    </dependency>
</dependencies>

<dependencyManagement>
    <dependencies>
        <dependency>
            <groupId>org.springframework.cloud</groupId>
            <artifactId>spring-cloud-dependencies</artifactId>
            <version>${spring-cloud.version}</version>
            <type>pom</type>
            <scope>import</scope>
        </dependency>
    </dependencies>
</dependencyManagement>
Here is the route configuration. replenishRate is the number of tokens refilled per second, burstCapacity is the bucket capacity, and requestedTokens is how many tokens each request consumes.
spring:
  application:
    name: gateway
  redis:
    host: 127.0.0.1
    port: 6379
  cloud:
    gateway:
      routes:
        - id: order-service
          uri: lb://order-service
          predicates:
            - Path=/order/**
          filters:
            - name: CustomRequestRateLimiter
              args:
                key-resolver: "#{@ipKeyResolver}"
                redis-rate-limiter.replenishRate: 10
                redis-rate-limiter.burstCapacity: 20
                redis-rate-limiter.requestedTokens: 1
The three parameters map straight back to the boba shop. replenishRate is how many tokens the kitchen makes per minute, burstCapacity is the bucket size, and requestedTokens is what a customer spends to pick up one drink.
3.4.3 KeyResolver: choosing the rate limit dimension
The built-in RedisRateLimiter needs to know which dimension to limit on. The bean below limits by client IP. In production you would usually switch to a user ID or an endpoint plus user combination.
package com.example.gateway.limiter;

import java.util.Objects;

import org.springframework.cloud.gateway.filter.ratelimit.KeyResolver;
import org.springframework.context.annotation.Bean;
import org.springframework.context.annotation.Configuration;

import reactor.core.publisher.Mono;

@Configuration
public class RateLimitConfig {

    /** Limits by client IP. Production usually combines a user ID or endpoint dimension. */
    @Bean
    public KeyResolver ipKeyResolver() {
        return exchange -> {
            String ip = Objects.requireNonNull(exchange.getRequest().getRemoteAddress())
                    .getAddress().getHostAddress();
            return Mono.just(ip);
        };
    }
}
3.4.4 Customizing the rate limit response
When the built-in filter rejects a request, it commits an empty 429 response and callers get no message. Returning a consistent JSON body takes two steps. First make the filter throw instead of committing the response, then let a unified exception handler render the JSON.
Start with the custom filter. It replicates the built-in decision flow and only changes the rejection path to throw a ResponseStatusException. The class name determines the filter name in the yml, so CustomRequestRateLimiterGatewayFilterFactory maps to CustomRequestRateLimiter.
package com.example.gateway.limiter;

import java.util.Map;

import org.springframework.cloud.gateway.filter.GatewayFilter;
import org.springframework.cloud.gateway.filter.factory.RequestRateLimiterGatewayFilterFactory;
import org.springframework.cloud.gateway.filter.ratelimit.KeyResolver;
import org.springframework.cloud.gateway.filter.ratelimit.RateLimiter;
import org.springframework.cloud.gateway.route.Route;
import org.springframework.cloud.gateway.support.ServerWebExchangeUtils;
import org.springframework.stereotype.Component;
import org.springframework.web.server.ResponseStatusException;

import reactor.core.publisher.Mono;

/**
 * The built-in rate limiter commits a bare 429 response when it rejects a request,
 * so callers receive no body. This subclass changes the rejection path to throw,
 * and a unified exception handler renders the JSON.
 *
 * @author Dylan
 */
@Component
public class CustomRequestRateLimiterGatewayFilterFactory
        extends RequestRateLimiterGatewayFilterFactory {

    public CustomRequestRateLimiterGatewayFilterFactory(RateLimiter rateLimiter, KeyResolver keyResolver) {
        super(rateLimiter, keyResolver);
    }

    @Override
    public GatewayFilter apply(Config config) {
        return (exchange, chain) -> {
            KeyResolver resolver = config.getKeyResolver() != null
                    ? config.getKeyResolver() : getDefaultKeyResolver();
            RateLimiter<?> limiter = config.getRateLimiter() != null
                    ? config.getRateLimiter() : getDefaultRateLimiter();

            return resolver.resolve(exchange).defaultIfEmpty("").flatMap(key -> {
                if (key.isEmpty()) {
                    if (isDenyEmptyKey()) {
                        return Mono.error(
                                new ResponseStatusException(config.getStatusCode(), "empty key"));
                    }
                    return chain.filter(exchange);
                }
                String routeId = config.getRouteId();
                if (routeId == null) {
                    Route route = exchange.getAttribute(ServerWebExchangeUtils.GATEWAY_ROUTE_ATTR);
                    routeId = route != null ? route.getId() : "";
                }
                String finalRouteId = routeId;
                return limiter.isAllowed(finalRouteId, key).flatMap(response -> {
                    for (Map.Entry<String, String> header : response.getHeaders().entrySet()) {
                        exchange.getResponse().getHeaders().add(header.getKey(), header.getValue());
                    }
                    if (response.isAllowed()) {
                        return chain.filter(exchange);
                    }
                    return Mono.error(
                            new ResponseStatusException(config.getStatusCode(), "rate limit exceeded"));
                });
            });
        };
    }
}
Then the exception handler. It only takes over for 429, and rethrows everything else to the framework’s default handling.
package com.example.gateway.limiter;

import java.nio.charset.StandardCharsets;

import org.springframework.boot.web.reactive.error.ErrorWebExceptionHandler;
import org.springframework.core.Ordered;
import org.springframework.core.annotation.Order;
import org.springframework.core.io.buffer.DataBuffer;
import org.springframework.http.HttpStatus;
import org.springframework.http.MediaType;
import org.springframework.stereotype.Component;
import org.springframework.web.server.ResponseStatusException;
import org.springframework.web.server.ServerWebExchange;

import reactor.core.publisher.Mono;

/**
 * Renders rate limit exceptions as a uniform JSON body.
 *
 * @author Dylan
 */
@Component
@Order(Ordered.HIGHEST_PRECEDENCE + 1)
public class RateLimitErrorWebExceptionHandler implements ErrorWebExceptionHandler {

    @Override
    public Mono<Void> handle(ServerWebExchange exchange, Throwable ex) {
        if (ex instanceof ResponseStatusException) {
            ResponseStatusException rse = (ResponseStatusException) ex;
            if (HttpStatus.TOO_MANY_REQUESTS.equals(rse.getStatus())) {
                exchange.getResponse().setStatusCode(HttpStatus.TOO_MANY_REQUESTS);
                exchange.getResponse().getHeaders().setContentType(MediaType.APPLICATION_JSON);
                String body = "{\"code\":429,\"message\":\"Too many requests, please try again later\"}";
                DataBuffer buffer = exchange.getResponse().bufferFactory()
                        .wrap(body.getBytes(StandardCharsets.UTF_8));
                return exchange.getResponse().writeWith(Mono.just(buffer));
            }
        }
        return Mono.error(ex);
    }
}
3.4.5 How to run it and verify it works
How to run it.
Add the gateway and reactive Redis dependencies and configure the route.
Put the KeyResolver, the custom filter, and the exception handler into the project.
Start the gateway and hit the limited route repeatedly.
How to verify it. Run curl -i 30 times in a row. The first 20 return the business result, and from request 21 the gateway returns HTTP 429 with the JSON body. The response headers also show the token bucket state, such as X-RateLimit-Remaining.
3.5 For comparison: Guava local rate limiting
Guava’s RateLimiter is a plain local token bucket and the simplest code in this article, which makes the local versus distributed difference easy to see. The demo uses Guava 32.1.3-jre, and the class is called DylanRateLimiterDemo. Run main and watch what happens.
<dependency>
    <groupId>com.google.guava</groupId>
    <artifactId>guava</artifactId>
    <version>32.1.3-jre</version>
</dependency>
package com.example.ratelimit;

import com.google.common.util.concurrent.RateLimiter;

/**
 * Local token bucket demo.
 *
 * @author Dylan
 */
public class DylanRateLimiterDemo {

    public static void main(String[] args) {
        // Refills 10 tokens per second, and the bucket capacity defaults to 10
        RateLimiter rateLimiter = RateLimiter.create(10.0);

        for (int i = 1; i <= 15; i++) {
            if (rateLimiter.tryAcquire()) {
                System.out.println("Request " + i + " allowed");
            } else {
                System.out.println("Request " + i + " rejected");
            }
        }
    }
}
When you run it, the first 10 requests pass and the rest are rejected. But it only works inside this JVM. With three instances behind a gateway, the total becomes 30. When a global quota is required, local rate limiting can only act as a fallback, not the primary mechanism.
3.6 Choosing among the three distributed implementations
There is no single right answer. Here is a conservative combination I would start with.
Use Spring Cloud Gateway at the entry for coarse, endpoint-level limiting that blocks most abnormal traffic.
Use Redisson inside services for precise, user-level limiting, with flexible rules and low integration cost.
Build your own with Jedis and Lua when you need a custom algorithm or want to avoid a framework, with full control over the logic.
Keep Guava for single machine scenarios and local fallbacks.
The combination follows one pattern. The closer a layer is to the traffic, the coarser its limiting. The closer it is to the business, the finer. Coarse layers chase speed, fine layers chase accuracy.
Chapter 4: Architecture design for distributed rate limiting, diagrams included
All four diagrams are written in Mermaid and render directly in Markdown. Each one comes with a short walkthrough.
4.1 Layered rate limiting architecture
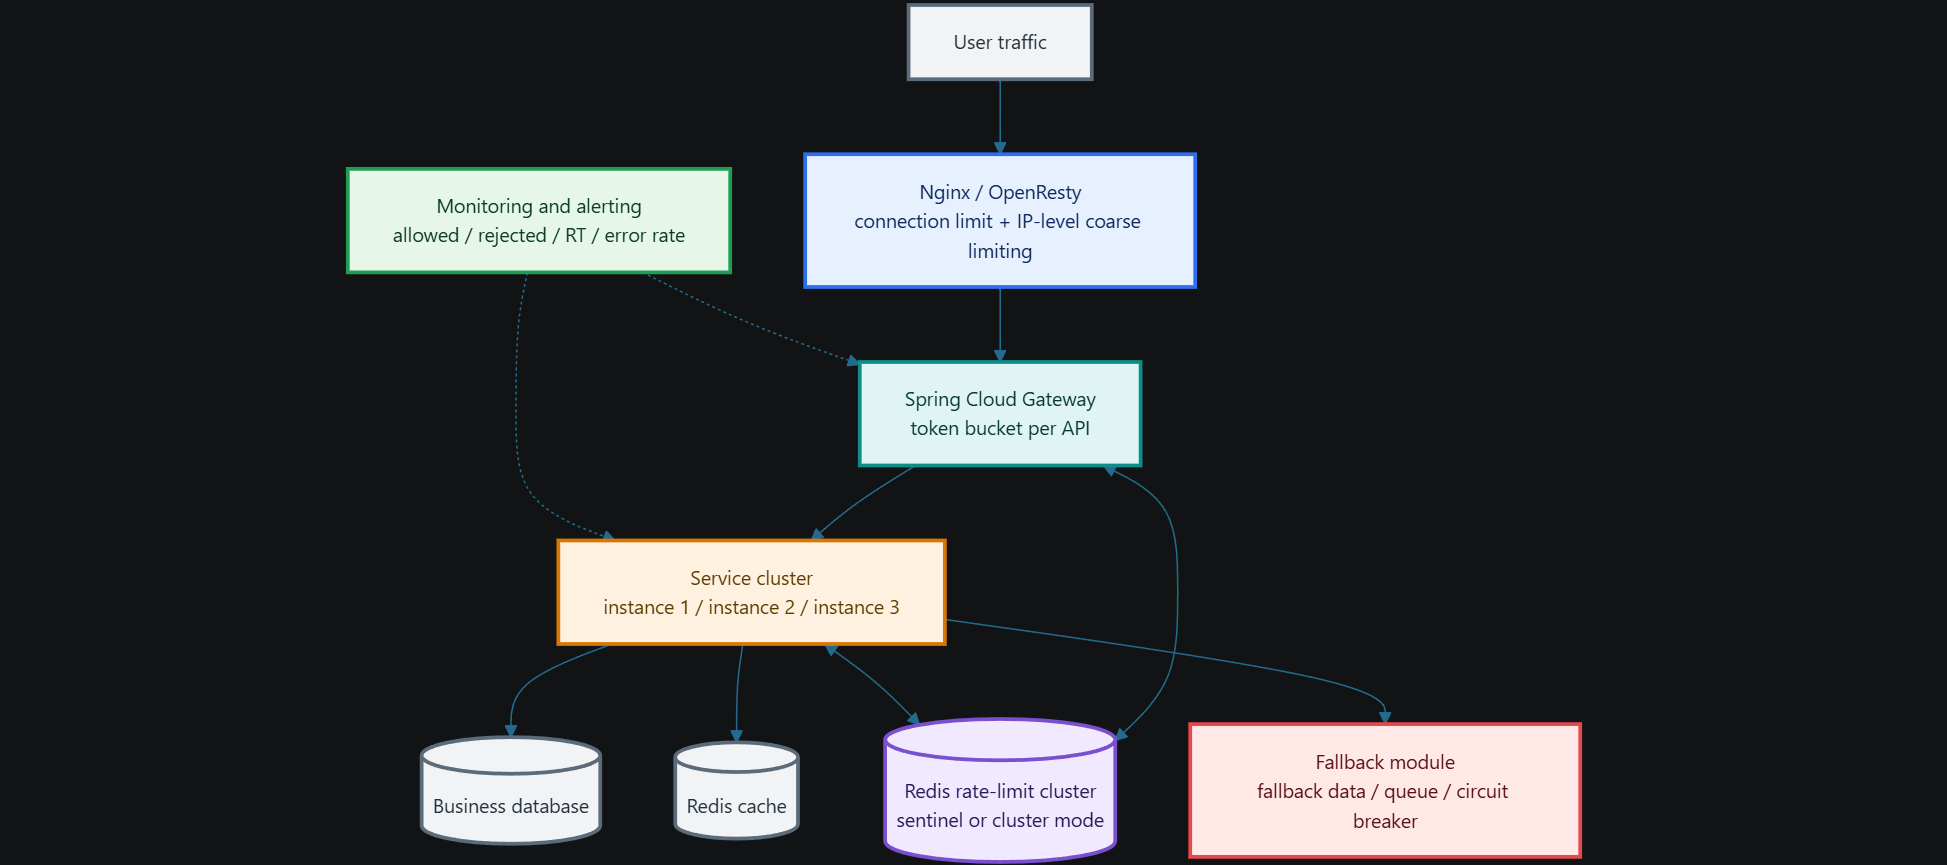
Traffic gets filtered layer by layer from the edge. Nginx applies coarse connection and IP level limits. The gateway limits by endpoint with a token bucket. Services then limit precisely by user. Each layer is configured independently, the coarse layers absorb the bulk, and the fine layers handle the details. All rate limiting state lives in the Redis cluster, so service instances stay stateless. The monitoring platform collects allowed counts, rejected counts, RT, and error rates, and pushes dynamic thresholds down to the gateway and services. The fallback module handles fail fast, queueing, and fallback data.
The point is that every layer limits, but each with a different granularity. As the granularity tightens, the room for error shrinks.
4.2 Token bucket execution flow
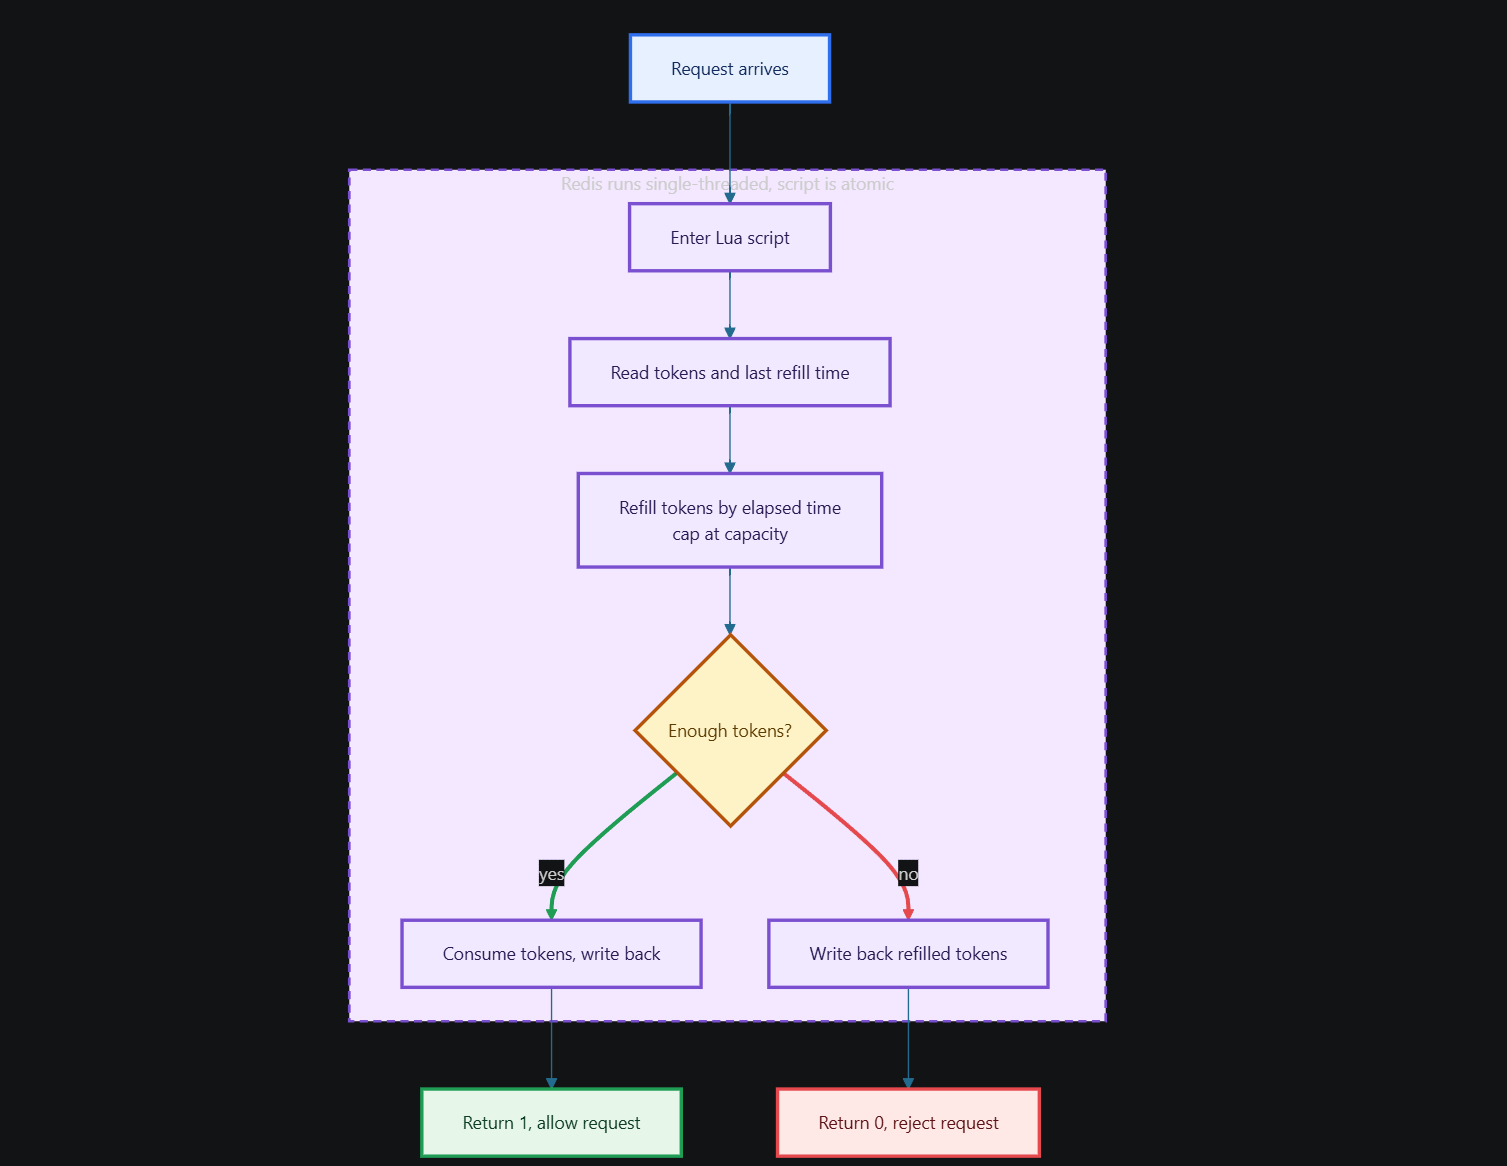
Inside the Lua script, the request first reads the token count and the last refill time, refills tokens by the elapsed time, and then decides. The whole flow runs atomically on Redis’s single thread, so no concurrent request can interleave and read stale state. A return of 1 allows the request, 0 rejects it, and the client does not need a second check. Time comes from the Redis server, so clock drift on application machines cannot affect the decision.
The only condition is whether the refilled token count is at least the number requested. Even a rejection writes the state back, so the next request always reads the latest value.
4.3 Rate limit fallback flow
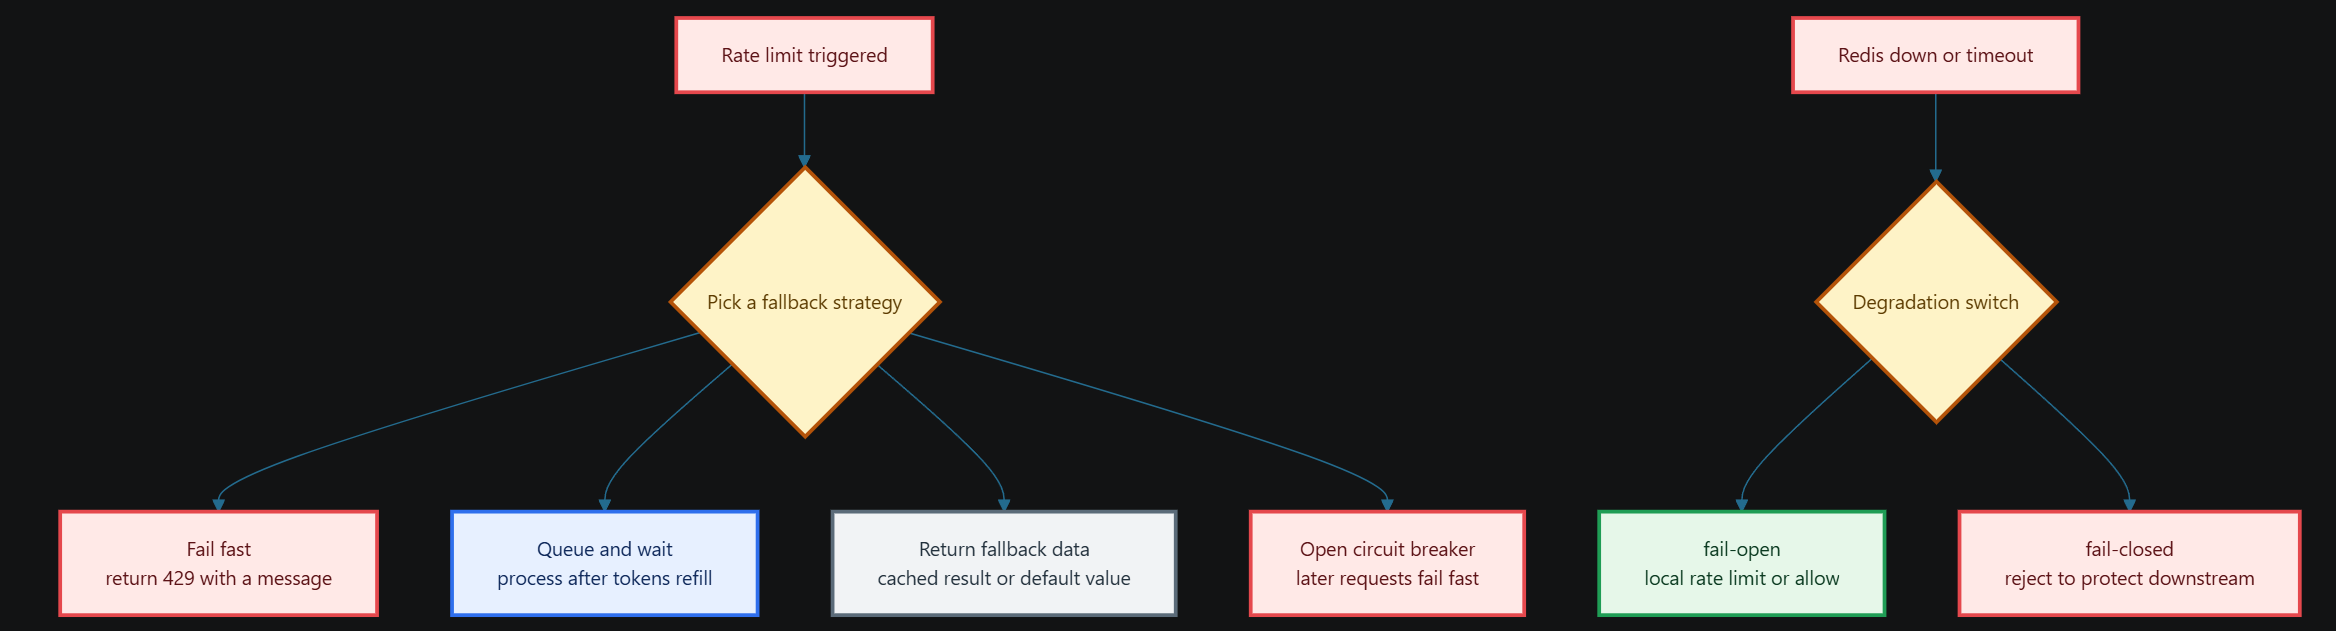
Once a request is limited, the chosen strategy depends on the business. Fail fast returns 429 directly. Queueing suits traffic shaping. Fallback data suits read-heavy workloads. A circuit breaker fits when the downstream is already failing. Redis failure takes a separate branch, where a degradation switch decides between fail-open and fail-closed. The switch lives in the config center, so it can change without a release, and traffic returns to Redis rate limiting automatically once Redis recovers.
Policies can be set per endpoint. Checkout fails fast, exports queue, and reads fall back to cache.
4.4 High availability deployment topology
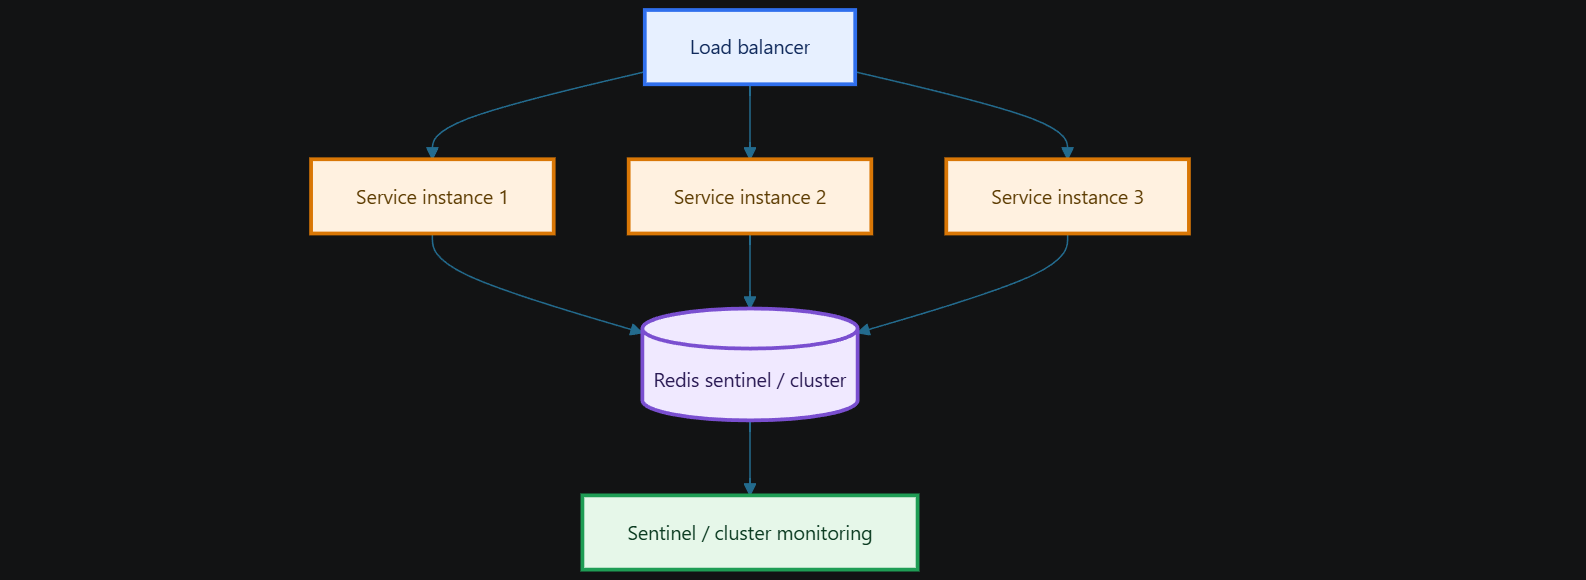
Service instances are stateless and all rate limiting state sits in Redis, so instances scale out freely. Redis runs in sentinel or cluster mode, and a master failure fails over automatically without losing the limiting state. Each instance only connects to Redis and does not depend on other instances, so one failing instance does not affect anyone else’s decisions. The monitoring platform watches Redis latency and replication state to catch capacity problems early.
Size for the worst case. Leave Redis QPS headroom for the rate limiting peak, and include replication lag in the monitoring.
Chapter 5: Production pitfalls and good practices
5.1 The pitfalls that show up most often
A single point of failure in Redis. Rate limiting depends on Redis, and when Redis goes down the limiting goes with it. Teams without a fallback end up either allowing everything or rejecting everything, and neither is controlled. Decide the fallback policy during design, not during the incident. The fix is in section 5.2.
Clock drift. If the script refills tokens using client time, a fast or slow application server shifts the decision. Use the Redis server time everywhere, and in multi region deployments watch the NTP sync on the Redis machines. When NTP drifts, the limiting clock and the business clock disagree, and log timestamps stop lining up.
Hot keys. Popular campaigns, bestsellers, and hot open source repositories all funnel requests onto a single key, and one Redis shard becomes the bottleneck. The usual fixes are layering local limiting under distributed limiting, or sharding the key by business so each shard carries its own quota. Keep the shard count modest. Eight shards are usually enough, and more than that starts costing accuracy.
Granularity that is too coarse or too fine. One global key means a single abusive user exhausts the limit for everyone. One key per user explodes memory and can be bypassed with throwaway accounts. A two-level combination works well, endpoint level for the total and user level for each user. The two keys would look like rate:api:order:create and rate:user:9527:order:create.
Killing legitimate requests. A threshold picked from thin air will hurt normal traffic the moment it fluctuates. Base the threshold on historical peak statistics, keep tuning against the rejection and false positive rates, and run load tests against the plan before a launch or campaign. Track the false positive rate itself. It is the first number I look at after a rate limiter ships.
5.2 High availability options
Redis high availability. Production should run at least sentinel mode, and cluster mode for critical traffic. All rate limiting state is read and written on the primary, with sentinel handling the failover.
Failover has a short window of unavailability, so test what the limiter does during that window too.
Kill switches. Keep three switches in the config center. A master switch turns rate limiting on or off. A degradation switch controls behavior after a Redis failure. A whitelist switch lets internal systems and load test traffic through.
Stripe’s engineering post on running rate limiters in production stresses the same two things. Fail open when Redis fails so the API does not go down with it, and keep a kill switch so the limiter can be disabled in one action. That matches the switch design above.
Multi-layer fallbacks. Nginx coarse limiting, gateway token buckets, and service local limiting stack into three layers. If one fails, the others keep working.
Local standby. Each instance carries a local token bucket and switches to it automatically when Redis fails. The per-instance value is the total divided by the instance count, so accuracy drops, but the system is never running without a limit.
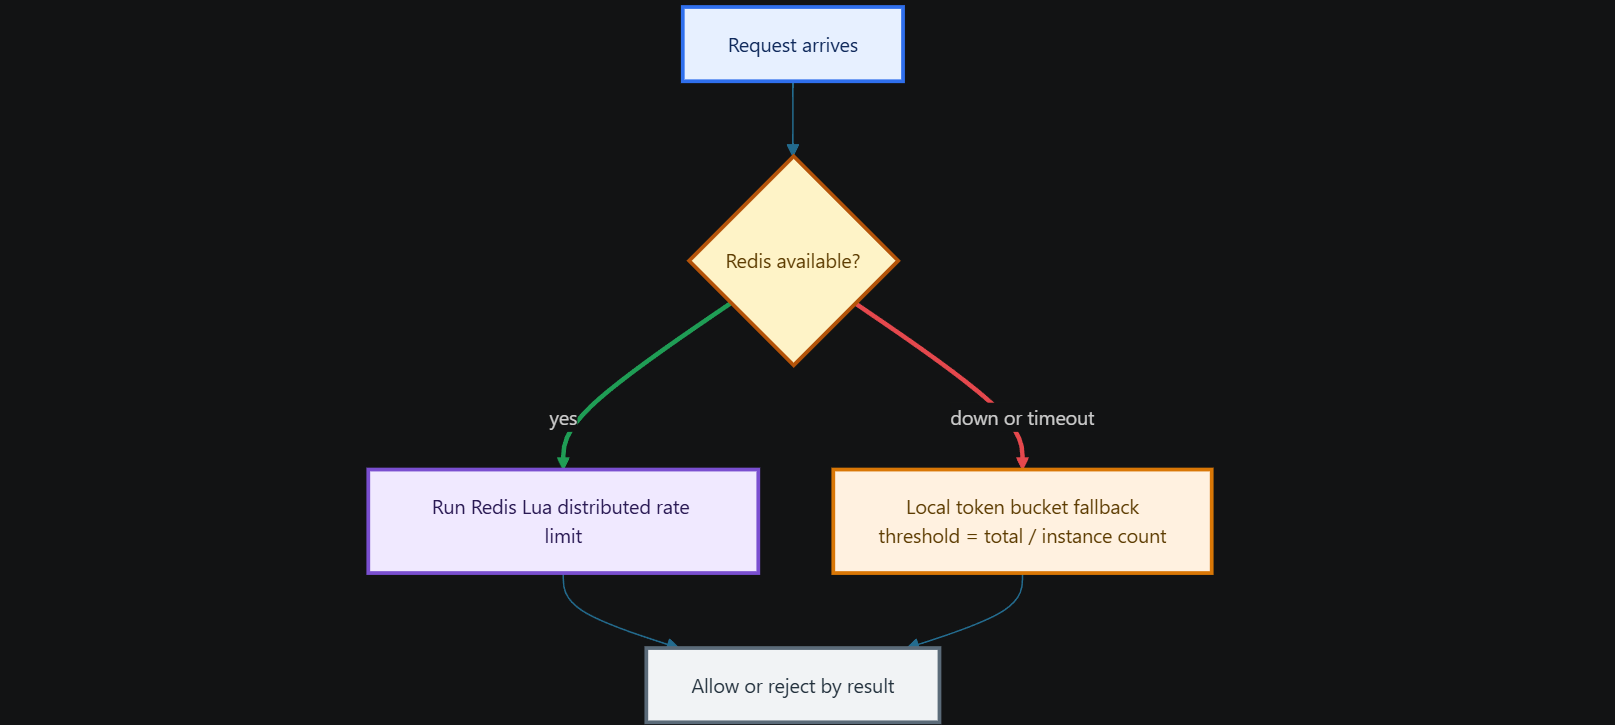
The limiter first checks whether Redis is available. If it is, the distributed path runs. On failure or timeout, it switches to the local token bucket immediately. The local threshold is the total divided by the instance count, less accurate but still a limit. When Redis recovers, it switches back, and callers never notice.
5.3 Monitoring and tuning
Track four metrics. Requests allowed, requests rejected, rejection rate, and limiter latency. A sudden jump in rejection rate usually means the threshold is too low. A jump in latency means Redis or the network has a problem. Export the metrics to Prometheus and set alert rules per endpoint tier.
If the limiter takes more than 10ms, investigate. It should stay under 1ms in normal conditions.
Do not guess alert thresholds. When allowed traffic drops and rejections spike at the same time, the limiter is almost certainly hurting legitimate users. Check the whitelist and dynamic thresholds first, then Redis latency.
Dynamic thresholds live in the config center. Keep them conservative day to day, raise them per the load test results before a launch or campaign, and roll back when it ends. Log every change so reviews have a trail.
Canary verification is a fixed step before launch. Route 1% of traffic, watch the rejection and error rates, and only scale up once there is no false positive problem. Rate limit config changes go through the same process, because they affect production just like code.
5.4 Choosing by scenario
The table gives defaults. Before production, weigh the team’s operational capacity, Redis availability, and how much false positive rate the business tolerates.
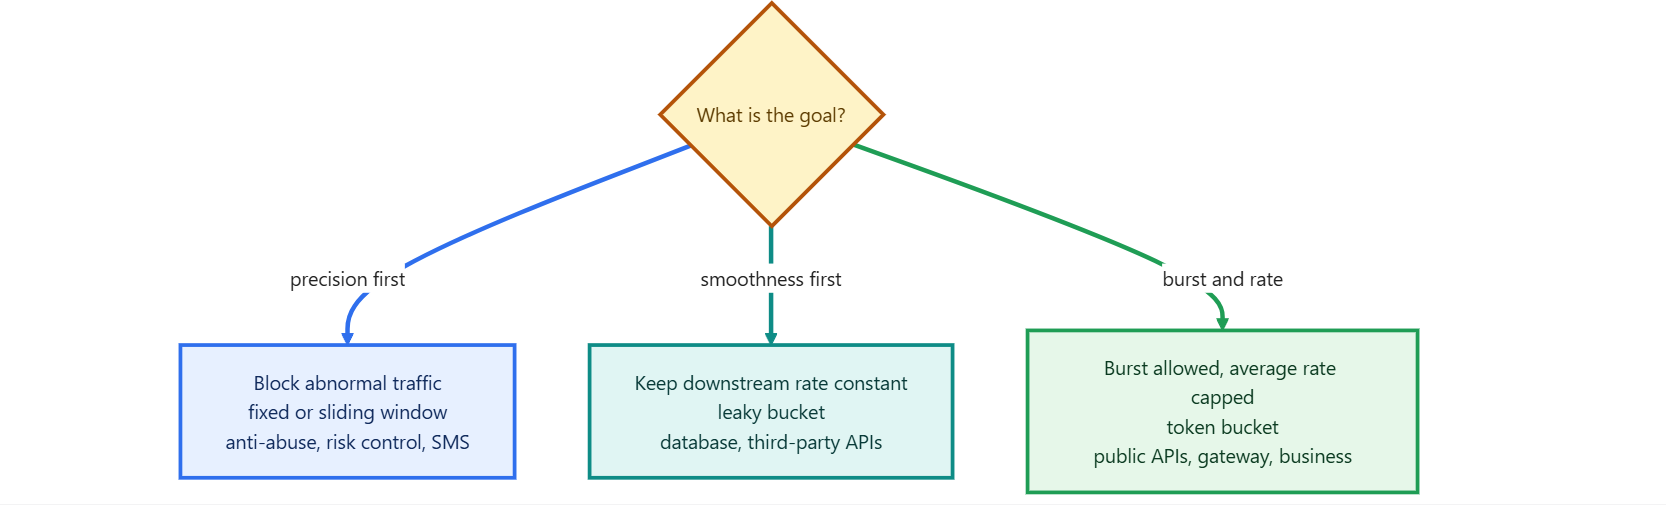
Start with the goal. Anti-abuse needs accuracy, so use a window. Protecting a database needs a constant rate, so use a leaky bucket. A public API needs both an average rate cap and burst tolerance, so use a token bucket. Once the goal is clear, the design mostly follows.

Chapter 6: Summary and next steps
6.1 The key points
Here are the key points.
The fixed window is simple but spikes at boundaries. The sliding window fixes the accuracy with time slices.
The leaky bucket guarantees smooth output. The token bucket allows bursts, and it is the default choice in production.
Distributed rate limiting puts the decision and the deduction in one Redis Lua script, which is what makes it atomic.
The gateway handles coarse limiting, services handle precise limiting, and local limiting covers fallbacks. All three layers together make a complete design.
Redis failures need a degradation switch, with fail-open or fail-closed chosen per business.
Memorizing those five only helps in interviews. To actually learn this, run the code in Chapter 3 and then load test it against the pitfalls in Chapter 5.
6.2 How rate limiting, circuit breaking, degradation, and isolation fit together
These four components get lumped together a lot, but their jobs are distinct.
Rate limiting caps the incoming rate at the entry, so overloaded requests never reach the business layer.
Circuit breaking watches the downstream and fails fast after repeated failures, stopping the spread.
Degradation decides what to return, fallback data or an error.
Isolation confines slow dependencies inside their own thread pool or semaphore, so one endpoint cannot take down the whole service.

The four pieces chain together in order. Rate limiting controls the input rate. Circuit breaking controls downstream failures. Isolation keeps slow dependencies inside their own pool. Degradation gives users a fallback result when things fail. Get the order wrong and both alerting and debugging get confusing.
A complete traffic management setup looks like this. Gateway limiting blocks most traffic. Service layer limiting protects the primary endpoints. Circuit breaking and degradation cover dependency failures. Isolation controls the blast radius. Those four components plus monitoring make the whole picture.
6.3 Questions to keep thinking about
Two questions to keep in mind, useful for interviews and for everyday design.
Question Should thresholds be dynamic or fixed? What should drive the adjustment?
Question Adaptive rate limiting can adjust thresholds from RT or error rates. What problem does that solve, and what new risks does it introduce?
I am not giving answers here. Being able to explain your own trade-offs beats memorizing ten conclusions.