


Today, let’s talk about how to implement asynchronous programming in a Spring Boot project. First, let’s see why asynchronous programming is used in Spring and what problems it can solve.
Why use an asynchronous framework and what problems does it solve?
In the daily development of Spring Boot, synchronous calls are generally used. However, in reality, there are many scenarios that are very suitable for asynchronous processing.
For example, when registering a new user, an email reminder will be sent. Later, when you upgrade to a member, you will be given 1000 points and other scenarios.
Taking the use case of registering a new user as an example, why is asynchronous processing necessary? There are mainly two aspects:
Fault tolerance and robustness: If an exception occurs when sending an email, the user registration cannot fail because of the failure of email sending. Because user registration is the main function and sending an email is a secondary function. When the user cannot receive the email but can see and log in to the system, they won’t care about the email.
Improving interface performance: For example, it takes 20 milliseconds to register a user and 2000 milliseconds to send an email. If synchronous mode is used, the total time consumption is about 2020 milliseconds, and the user can clearly feel sluggish. But if asynchronous mode is used, registration can be successful in just a few tens of milliseconds. This is an instant thing.
How does Spring Boot implement asynchronous calls?
After knowing why asynchronous calls are needed, let’s see how Spring Boot implements such code.
In fact, it is very simple. Starting from Spring 3, the @Async annotation is provided. We only need to mark this annotation on the method, and this method can implement asynchronous calls.
Of course, we also need a configuration class and add the annotation @EnableAsync to the configuration class to enable asynchronous functions.
First step: Create a configuration class and enable asynchronous function support
Use @EnableAsync to enable asynchronous task support. The @EnableAsync annotation can be directly placed on the Spring Boot startup class or on other configuration classes separately. Here we choose to use a separate configuration class SyncConfiguration.
@Configuration
@EnableAsync
public class AsyncConfiguration {
   // do nothing
}
Second step: Mark the method as an asynchronous call
Add a Component class for business processing. At the same time, add the @Async annotation, which indicates that this method is asynchronous processing.
@Component
public class AsyncTask {

    @Async
    public void sendEmail() {
        long t1 = System.currentTimeMillis();
        Thread.sleep(2000);
        long t2 = System.currentTimeMillis();
        System.out.println(”Sending an email took “ + (t2-t1) + “ ms”);
    }
}
Third step: Call asynchronous methods in the Controller.
@RestController
@RequestMapping(”/user”)
public class AsyncController {

    @Autowired
    private AsyncTask asyncTask;

    @RequestMapping(”/register”)
    public void register() throws InterruptedException {
        long t1 = System.currentTimeMillis();
        // Simulate the time required for user registration.
        Thread.sleep(20);
        // Registration is successful. Send an email.
        asyncTask.sendEmail();
        long t2 = System.currentTimeMillis();
        System.out.println(”Registering a user took “ + (t2-t1) + “ ms”);
    }
}
After accessing http://localhost:8080/user/register, view the console log.
Registering a user took 29 ms
Sending an email took 2006 ms
As can be seen from the log, the main thread does not need to wait for the execution of the email sending method to complete before returning, effectively reducing the response time and improving the interface performance.
Through the above three steps, we can easily use asynchronous methods in Spring Boot to improve our interface performance. Isn’t it very simple?
However, if you really implement it this way in a company project, it will definitely be rejected during code review and you may even be reprimanded. 😫
Because the above code ignores the biggest problem, which is that a custom thread pool has not been provided for the @Async asynchronous framework.
Why should we customize a thread pool for @Async?
When using the @Async annotation, by default, the SimpleAsyncTaskExecutor thread pool is used. This thread pool is not a true thread pool.
Using this thread pool cannot achieve thread reuse. A new thread will be created every time it is called. If threads are continuously created in the system, it will eventually lead to excessive memory usage by the system and cause an OutOfMemoryError!!!
The key code is as follows:
public void execute(Runnable task, long startTimeout) {
      Assert.notNull(task, “Runnable must not be null”);
      Runnable taskToUse = this.taskDecorator != null ? this.taskDecorator.decorate(task) : task;
      // Determine whether rate limiting is enabled. By default, it is not enabled.
      if (this.isThrottleActive() && startTimeout > 0L) {
            // Perform pre-operations and implement rate limiting.
            this.concurrencyThrottle.beforeAccess();
            this.doExecute(new SimpleAsyncTaskExecutor.ConcurrencyThrottlingRunnable(taskToUse));
      } else {
            // In the case of no rate limiting, execute thread tasks.
            this.doExecute(taskToUse);
      }
}

protected void doExecute(Runnable task) {
      // Continuously create threads.
      Thread thread = this.threadFactory != null ? this.threadFactory.newThread(task) : this.createThread(task);
      thread.start();
}

public Thread createThread(Runnable runnable) {
     //Specify the thread name, task-1, task-2, task-3...
      Thread thread = new Thread(this.getThreadGroup(), runnable, this.nextThreadName());
      thread.setPriority(this.getThreadPriority());
      thread.setDaemon(this.isDaemon());
      return thread;
}
If you output the thread name again, it can be easily found that each time the printed thread name is in the form of [task-1], [task-2], [task-3], [task-4], and the serial number at the back is continuously increasing.
For this reason, when using the @Async asynchronous framework in Spring, we must customize a thread pool to replace the default SimpleAsyncTaskExecutor.
Spring provides a variety of thread pools to choose from:
SimpleAsyncTaskExecutor: Not a real thread pool. This class does not reuse threads and creates a new thread every time it is called.SyncTaskExecutor: This class does not implement asynchronous calls and is only a synchronous operation. Only applicable to scenarios where multithreading is not needed.ConcurrentTaskExecutor: An adaptation class for Executor. Not recommended. Consider using this class only when ThreadPoolTaskExecutor does not meet the requirements.ThreadPoolTaskScheduler: Can use cron expressions.ThreadPoolTaskExecutor: Most commonly used and recommended. In essence, it is a wrapper for java.util.concurrent.ThreadPoolExecutor.
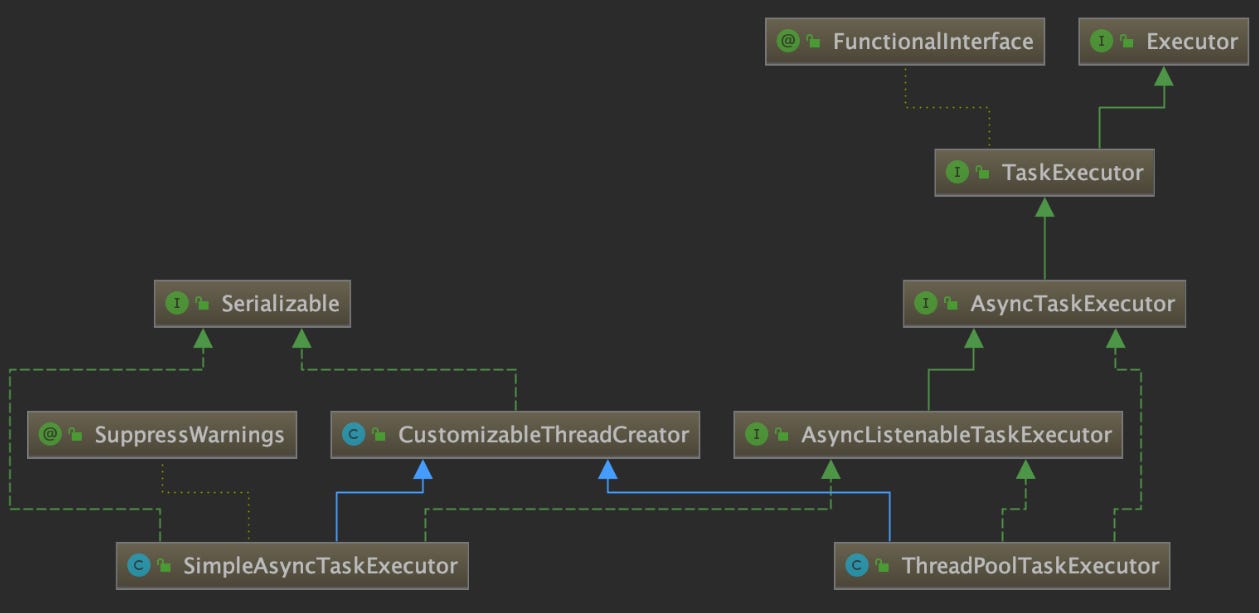
The implementation paths of SimpleAsyncTaskExecutor and ThreadPoolTaskExecutor are as follows:
Implement a custom thread pool
Let’s directly look at the code implementation. Here, a thread pool named asyncPoolTaskExecutor is implemented:
@Configuration
@EnableAsync
public class SyncConfiguration {
    @Bean(name = “myAsyncPoolTaskExecutor”)
    public ThreadPoolTaskExecutor executor() {
        ThreadPoolTaskExecutor taskExecutor = new ThreadPoolTaskExecutor();
        // Core thread count.
        taskExecutor.setCorePoolSize(10);
        // The maximum number of threads maintained in the thread pool. Only when the buffer queue is full will threads exceeding the core thread count be requested.
        taskExecutor.setMaxPoolSize(100);
        // Cache queue.
        taskExecutor.setQueueCapacity(50);
        // Allowed idle time. Threads other than core threads will be destroyed after the idle time arrives.
        taskExecutor.setKeepAliveSeconds(200);
        // Thread name prefix for asynchronous methods.
        taskExecutor.setThreadNamePrefix(”async-”);
        /**
         * When the task cache queue of the thread pool is full and the number of threads in the thread pool reaches maximumPoolSize, if there are still tasks coming, a task rejection policy will be adopted.
         * There are usually four policies:
         * ThreadPoolExecutor.AbortPolicy: Discard the task and throw RejectedExecutionException.
         * ThreadPoolExecutor.DiscardPolicy: Also discard the task, but do not throw an exception.
         * ThreadPoolExecutor.DiscardOldestPolicy: Discard the task at the front of the queue and then try to execute the task again (repeat this process).
         * ThreadPoolExecutor.CallerRunsPolicy: Retry adding the current task and automatically call the execute() method repeatedly until it succeeds.
         */
        taskExecutor.setRejectedExecutionHandler(new ThreadPoolExecutor.CallerRunsPolicy());
        taskExecutor.initialize();
        return taskExecutor;
    }
}
Congratulations! After customizing the thread pool, we can boldly use the asynchronous processing capability provided by @Async. 😊
Configure multiple thread pools
In the development of real Internet projects, for high-concurrency requests, the general approach is to isolate high-concurrency interfaces with separate thread pools for processing.
Suppose there are currently two high-concurrency interfaces. Generally, two thread pools will be defined according to the interface characteristics. At this time, when we use @Async, we need to distinguish by specifying different thread pool names.
Specify a specific thread pool for @Async
@Async(”myAsyncPoolTaskExecutor”)
public void sendEmail() {
    long t1 = System.currentTimeMillis();
    Thread.sleep(2000);
    long t2 = System.currentTimeMillis();
    System.out.println(”Sending an email took “ + (t2-t1) + “ ms”);
}
When there are multiple thread pools in the system, we can also configure a default thread pool. For non-default asynchronous tasks, we can specify the thread pool name through @Async("otherTaskExecutor").
Configure the default thread pool
The configuration class can be modified to implement AsyncConfigurer and override the getAsyncExecutor() method to specify the default thread pool:
@Configuration
@EnableAsync
@Slf4j
public class AsyncConfiguration implements AsyncConfigurer {

    @Bean(name = “myAsyncPoolTaskExecutor”)
    public ThreadPoolTaskExecutor executor() {
        // Initialization code for thread pool configuration as above.
    }

    @Bean(name = “otherTaskExecutor”)
    public ThreadPoolTaskExecutor otherExecutor() {
        // Initialization code for thread pool configuration as above.
    }

    /**
     * Specify the default thread pool.
     */
    @Override
    public Executor getAsyncExecutor() {
        return executor();
    }

    @Override
    public AsyncUncaughtExceptionHandler getAsyncUncaughtExceptionHandler() {
        return (ex, method, params) ->
                log.error(”An unknown error occurred while executing tasks in the thread pool. Executing method: {}”, method.getName(), ex);
    }
}
As follows, the sendEmail() method uses the default thread pool myAsyncPoolTaskExecutor, and the otherTask() method uses the thread pool otherTaskExecutor, which is very flexible.
@Async(”myAsyncPoolTaskExecutor”)
public void sendEmail() {
    long t1 = System.currentTimeMillis();
    Thread.sleep(2000);
    long t2 = System.currentTimeMillis();
    System.out.println(”Sending an email took “ + (t2-t1) + “ ms”);
}

@Async(”otherTaskExecutor”)
public void otherTask() {
    //...
}
Many times, @Async is often used in conjunction with Spring Event to optimize the code structure, interested parties can read this article.
The above is all the content shared this time! If the article was helpful, please clap 👏and follow, thank you! ╰(*°▽°*)╯**
I’m Dylan, looking forward to progressing with you. ❤️